

Welcome to the official D-Lay Cable blog! As leaders in high-performance cabling solutions, we believe in empowering our customers with the knowledge to get the job done right. Making your own Ethernet cables gives you the power to create custom lengths, save on costs for large projects, and ensure the highest quality connection from end to end. While it may seem daunting, with the right tools, quality materials, and a little practice, you can terminate a Cat5e cable like a seasoned pro.
dlaycable will walk you through every step, ensuring a reliable, high-speed connection for your home or business network.
Article Directory
1. Gathering Your Tools & Materials
Starting with the right equipment is the foundation of a professional-quality cable. A poor-quality tool or cable can lead to a failed connection that’s difficult to troubleshoot. Here’s what you’ll need:
- Bulk Cat5e Cable: This is the most critical component. For the best performance and signal integrity, we strongly recommend using a cable with 100% pure solid copper conductors, like our D-Lay Cable Pro-Grade Cat5e. Avoid Copper Clad Aluminum (CCA) cables, which are brittle and offer inferior performance.
- RJ45 Connectors (Plugs): These are the plastic ends that plug into your devices. Ensure you get Cat5e-rated connectors. Using pass-through connectors can make the process easier for beginners, as they allow the wires to pass all the way through the plug for visual verification before crimping.
- Crimping Tool: This tool performs two functions: it secures the RJ45 plug onto the cable jacket and pushes the pin contacts down to make a connection with the wires. A good ratcheting crimper will ensure a consistent, solid crimp every time.
- Cable Stripper or Wire Strippers: While a crimping tool often has a built-in stripper, a dedicated tool provides more control and reduces the risk of nicking the inner wires.
- Flush Cutters or Networking Scissors: You need a sharp, precise tool to get a clean, straight cut across the eight wires before inserting them into the plug.
- Ethernet Cable Tester (LAN Tester): This is a non-negotiable tool for professionals. A tester will instantly tell you if you have a good connection and if the wires are in the correct order, saving you hours of frustration.
2. Understanding the Wiring Standard: T568B vs. T568A
Before you start, you must choose a wiring standard. There are two standards recognized by the TIA/EIA: T568A and T568B. While both work, T568B is the most common standard used in modern networks. For a standard “straight-through” cable (used to connect a computer to a switch, router, or wall jack), you must use the same standard on both ends.
Our recommendation: Use T568B for all standard cables unless you are matching existing wiring that uses T568A.
Here is the color code for T568B, which we will use in this guide. The wires are ordered from left to right (Pin 1 to Pin 8) when looking at the top of the RJ45 plug (with the locking tab facing away from you).
- White/Orange
- Orange
- White/Green
- Blue
- White/Blue
- Green
- White/Brown
- Brown
3. Step-by-Step Guide to Making Your Cat5e Cable
With your tools ready and the T568B standard in mind, it’s time to build your cable. Take your time on the first few attempts—precision is more important than speed.
Step 1: Strip the Outer Jacket
Carefully use your cable stripper to score and remove about 1 inch (2.5 cm) of the outer cable jacket. The goal is to cut only the jacket without nicking or cutting the twisted pairs of wires inside. Once scored, you can simply pull the end of the jacket off.
Step 2: Expose, Separate, and Untwist the Wires
Inside the jacket, you will find four twisted pairs of wires and often a thin nylon string (rip cord), which you can trim off. Gently separate the four pairs from each other. Then, carefully untwist each pair all the way down to the base of the jacket, so you have eight individual wires.
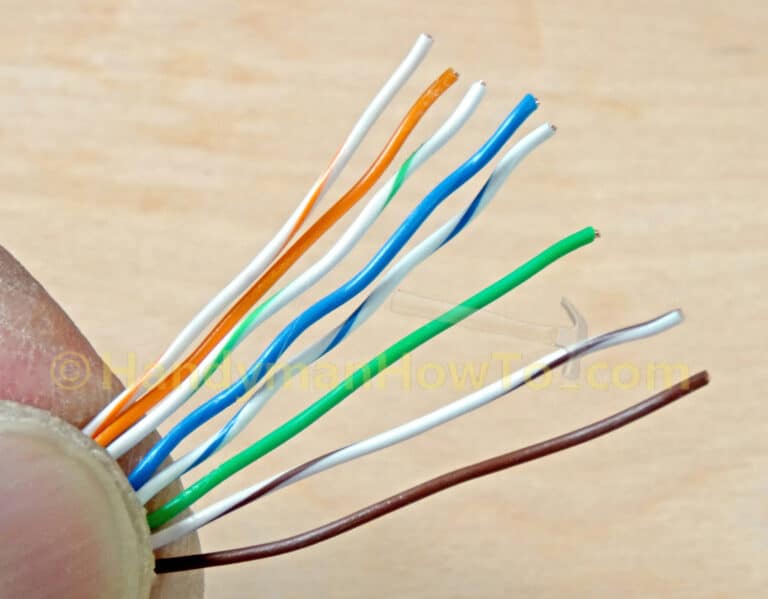
Step 3: Arrange the Wires in T568B Order
This is the most crucial step. Using the T568B color code from above, arrange the eight wires in a flat, straight ribbon. From left to right:
White/Orange, Orange, White/Green, Blue, White/Blue, Green, White/Brown, Brown.
Use your thumb and forefinger to pinch the wires together near the jacket to keep them flat and in order.
Step 4: Flatten and Trim the Wires
Keeping the wires in their correct order, continue to flatten them until they are perfectly aligned. Now, use your flush cutters to make a single, clean cut straight across the wires, leaving about ½ inch (1.25 cm) of wire exposed from the jacket. A straight, even cut is essential for all wires to make proper contact inside the plug.
Step 5: Insert Wires into the RJ45 Plug
Hold the RJ45 plug with the locking tab facing down. Carefully slide the ribbon of wires into the plug, ensuring they remain in the correct order. Push firmly but gently until the wires reach the very end of the plug. Visually inspect from the top and end of the plug; you should see the copper tip of each wire at the end. The outer cable jacket should also be pushed inside the plug, past the strain relief clamp, to ensure a secure crimp.
Step 6: Crimp the Connector
Insert the RJ45 plug into the appropriate slot on your crimping tool. Squeeze the handles firmly and completely. A good ratcheting tool will click to let you know the crimp is complete. This action does two things: it pushes the gold pins into the wires to establish a connection and secures the cable jacket in place.
Step 7: Repeat for the Other End
You now have one end terminated. Repeat steps 1-6 for the other end of the cable, ensuring you use the same T568B standard for a straight-through connection.
4. Final Step: Testing and Verification
Do not skip this step! Plug both ends of your newly made cable into your LAN tester. Turn it on. The tester will send a signal down each of the 8 wires. A good cable will show a sequential illumination of lights from 1 to 8 on both the main unit and the remote unit. If any light is out of order, dim, or doesn’t light up, you have a fault. The most common cause is an incorrect wire order, so double-check your work from Step 3.
5. The D-Lay Cable Advantage: Why Quality Components Matter
Congratulations! You’ve successfully created a custom Ethernet cable. The quality of this cable, however, is determined entirely by the components you used. This is where D-Lay Cable makes the difference.
- Pure Copper Conductors: Our cables use 100% solid pure copper. This guarantees maximum conductivity, lower heat generation, and full compliance with PoE (Power over Ethernet) standards. It’s the professional’s choice for a reason.
- Precision Engineering: From the twist-rate of our wire pairs to the durability of our jackets, every D-Lay cable is built to exceed industry standards, minimizing crosstalk and ensuring reliable gigabit speeds.
- Reliable Connectors and Tools: Pairing our cable with high-quality RJ45 plugs and a solid crimping tool ensures that the weak point in most networks—the termination—is as strong as the cable itself.
By making your own cables with premium D-Lay Cable products, you’re not just creating a connection; you’re building a reliable, high-performance network foundation. For all your cabling needs, from bulk wire to professional tools, explore our full catalog at www.dlaycable.com.