

At Dlaycable, we’ve spent over 15 years manufacturing and supplying high-quality networking components. We understand that while pre-made patch cords are perfect for many applications, the ability to create custom-length Ethernet cables is an invaluable skill for any IT professional, network installer, or dedicated DIY enthusiast. It allows for cleaner installations, eliminates unnecessary cable slack, and can be more cost-effective for large projects.
This comprehensive guide leverages our industry expertise to walk you through the process of terminating a Cat5e cable with an RJ45 connector. Follow these steps to create reliable, high-performance network cables every time.
Before You Begin: Assembling Your Toolkit
A professional result starts with professional tools and materials. Using low-quality components is the number one cause of network failures and slow speeds. Here’s what you’ll need:
- High-Quality Bulk Cat5e Cable: This is the foundation of your network. For best performance and reliability, we strongly recommend using a cable with 100% pure solid copper conductors, like those we manufacture at Dlaycable. Avoid Copper Clad Aluminum (CCA) which is brittle and has inferior conductivity.
- RJ45 Connectors for Cat5e: These are the plastic plugs at each end. Ensure they are specifically designed for Cat5e solid or stranded cable, whichever you are using.
- RJ45 Crimping Tool: This tool performs three essential functions: it cuts the cable, strips the outer jacket, and most importantly, crimps the RJ45 connector, pushing the pins through the insulation to make contact with the copper wires.
- Cable Stripper: While most crimpers have a stripper, a dedicated tool can offer more precise control to avoid nicking the inner conductors.
- Network Cable Tester: This is not an optional tool for a professional job. A tester verifies that all eight wires are correctly ordered and making a solid connection. It’s the only way to be 100% certain your cable is perfect.
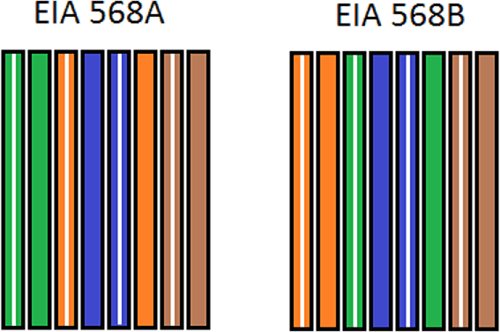
The Blueprint: Understanding T568A vs. T568B Wiring
Inside an Ethernet cable are eight wires, organized as four twisted pairs. To make them work, you must arrange them in a specific order. There are two industry-standard wiring schemes recognized by the TIA/EIA: T568A and T568B.
- T568B: This is the most common standard used in the United States and for new network installations. We recommend using this standard unless you are matching an existing T568A installation.
- T568A: This standard is used in some government contracts and international projects.
The key is consistency. A standard “straight-through” cable, used for connecting a computer to a switch or router, will have the same standard (e.g., T568B) on both ends.
T568B Wiring Order (Left to Right, with the RJ45 tab facing down):
- Orange/White Stripe
- Orange (Solid)
- Green/White Stripe
- Blue (Solid)
- Blue/White Stripe
- Green (Solid)
- Brown/White Stripe
- Brown (Solid)
T568A Wiring Order (Left to Right, with the RJ45 tab facing down):
- Green/White Stripe
- Green (Solid)
- Orange/White Stripe
- Blue (Solid)
- Blue/White Stripe
- Orange (Solid)
- Brown/White Stripe
- Brown (Solid)
The Step-by-Step Guide to a Perfect Crimp
With your tools ready and your wiring standard chosen (we’ll use T568B for this example), you’re ready to begin.
Step 1: Measure and Cut Your Cable
Measure the length you need and add a few extra inches to be safe. Use the cutter on your crimping tool to make a clean, flat cut.
Step 2: Strip the Outer Jacket
Using your cable stripper or the stripper on the crimp tool, carefully score and remove about 1 inch (2.5 cm) of the outer PVC jacket. Be very careful not to cut or nick the twisted pairs inside. Once scored, the jacket should pull off easily.
Step 3: Unwind and Arrange the Wires
Untwist the four pairs of wires and separate them. To make them easier to work with, try to straighten them out as much as possible by running your fingers firmly along their length. Then, carefully arrange them in the T568B order from left to right.
Pro-Tip: Keeping the twists as close to the end of the jacket as possible helps reduce “crosstalk” (interference) and ensures better performance. Do not untwist more than 0.5 inches (1.25 cm).
Step 4: Flatten and Trim the Wires
Pinch the ordered wires tightly between your thumb and forefinger to create a flat, ribbon-like line. Double-check the color order. Now, using the cutter, trim the ends so they are perfectly flush and extend about 0.5 inches from the edge of the jacket.
Step 5: Insert Wires into the RJ45 Connector
Holding the connector with the tab facing down, carefully slide the aligned wires into the plug. The wires should slide into their own individual channels. Push firmly until all wire ends are pressed against the very front of the connector. You should be able to see the shiny copper ends through the transparent plastic tip.
Crucially, ensure the PVC jacket is also pushed inside the back of the connector. This allows the crimp to secure the jacket, providing strain relief and preventing the delicate wires from being pulled out.
Step 6: Crimp the Connector
Carefully insert the RJ45 connector into the appropriate slot on your crimping tool. Squeeze the handles firmly and evenly. You should hear and feel a “click” as the tool pushes the gold-plated pins down to pierce the wires and simultaneously secures the cable jacket. Remove the cable from the tool.
Step 7: Repeat for the Other End
Now, simply repeat steps 1-6 on the other end of the cable, ensuring you use the exact same T568B wiring scheme for a straight-through cable.
The Final Check: Testing Your Cable
This is the step that separates amateurs from professionals. Plug both ends of your newly made cable into your network cable tester. A good tester will have a main unit and a remote unit. It will send signals down each of the 8 wires, lighting up LEDs in sequence (1 through 8) on both units. If the lights flash in order on both sides, your cable is a success!
Troubleshooting Common Issues
If your cable fails the test, don’t worry. The issue is almost always one of the following:
- Incorrect Wire Order: The most common mistake. Cut off the connector and start again, paying close attention to the T568B color code.
- Wires Not Fully Seated: One or more wires didn’t reach the front of the connector. When you look at the tip, all 8 wires should be visible.
- Poor Crimp / No Connection: The crimp wasn’t firm enough, and the pins didn’t pierce the wire insulation. Crimp again with more force, or if that fails, use a new connector.
- Jacket Not Secured: The PVC jacket was not pushed far enough into the connector before crimping, leaving the individual wires to bear all the strain. This will lead to premature failure.
Your Partner in Professional Networking
Congratulations! You’ve just created a professional-grade, custom Ethernet cable. This skill will serve you well in any networking project, ensuring clean, reliable, and high-performance connections.
At Dlaycable, we are more than just a supplier; we are your partner in success. Whether you need 1,000 meters of our Fluke-tested pure copper bulk cable for a major installation or just the right tools and connectors for your workshop, we provide the quality and expertise you can depend on. Explore our complete range of networking solutions on our website or contact our team for your OEM/ODM project needs.