

As a leading manufacturer of high-performance network cabling solutions, we at Dlay Cable understand that a reliable network is built on quality components and expert craftsmanship. While we offer a full range of pre-terminated patch cords, knowing how to create your own custom-length Ethernet cables is an invaluable skill for any professional installer, IT technician, or dedicated DIYer. A perfect termination ensures optimal signal integrity and network performance.
This comprehensive guide will walk you through the process of connecting ends—also known as terminating—to a Cat5e Ethernet cable using the industry-standard T568B wiring scheme. Follow these steps to create flawless, high-performance cables every time.
Part 1: Gathering Your Tools and Materials
Success starts with the right equipment. Using substandard tools or materials can lead to failed connections and frustrating troubleshooting. For a professional result, we recommend the following:
- High-Quality Bulk Cat5e Cable: The foundation of your cable. Using a premium cable like Dlay Cable’s pure copper Cat5e ensures superior conductivity and durability compared to Copper Clad Aluminum (CCA) alternatives.
- Cat5e RJ45 Connectors (Plugs): These are the plastic ends that plug into your devices. Ensure they are specifically rated for Cat5e solid or stranded cable, depending on what you are using.
- Ethernet Crimping Tool: This essential tool performs two functions: it presses the RJ45 connector’s pins into the wires and secures the cable to the plug for strain relief. A good crimper is a worthwhile investment.
- Wire Stripper / Cable Jacket Stripper: While many crimpers have a built-in stripper, a dedicated tool can provide a cleaner, more precise cut without nicking the inner wires.
- Wire Cutters: Sharp, flush cutters are crucial for creating a clean, even edge on the eight small wires before inserting them into the connector.
- Ethernet Cable Tester: This is a non-negotiable tool for professionals. A tester verifies that every wire is correctly connected and that there are no shorts, saving you immense time and effort.
Part 2: Understanding the T568A vs. T568B Wiring Standards
Inside a Cat5e cable are eight wires, organized into four twisted pairs. To make them work, they must be arranged in a specific order. There are two recognized standards: T568A and T568B.
- T568B: This is the most common standard used in modern networks in North America and worldwide. For consistency and to avoid confusion, we strongly recommend using the T568B standard for all your new cable runs.
- T568A: This standard is often seen in older installations and is required for U.S. government contracts.
To create a standard “straight-through” cable (used for connecting a computer to a switch, router, or wall jack), you must use the same standard on both ends. dlaycable will focus on T568B.
The T568B Color Code (from left to right):
- White/Orange
- Orange
- White/Green
- Blue
- White/Blue
- Green
- White/Brown
- Brown
Pro Tip: Commit this color code to memory. It’s the key to every successful termination.
Part 3: The Step-by-Step Guide to Terminating Cat5e Cable
With your tools ready and the T568B color code in mind, you’re ready to begin. Work on a clean, well-lit surface.
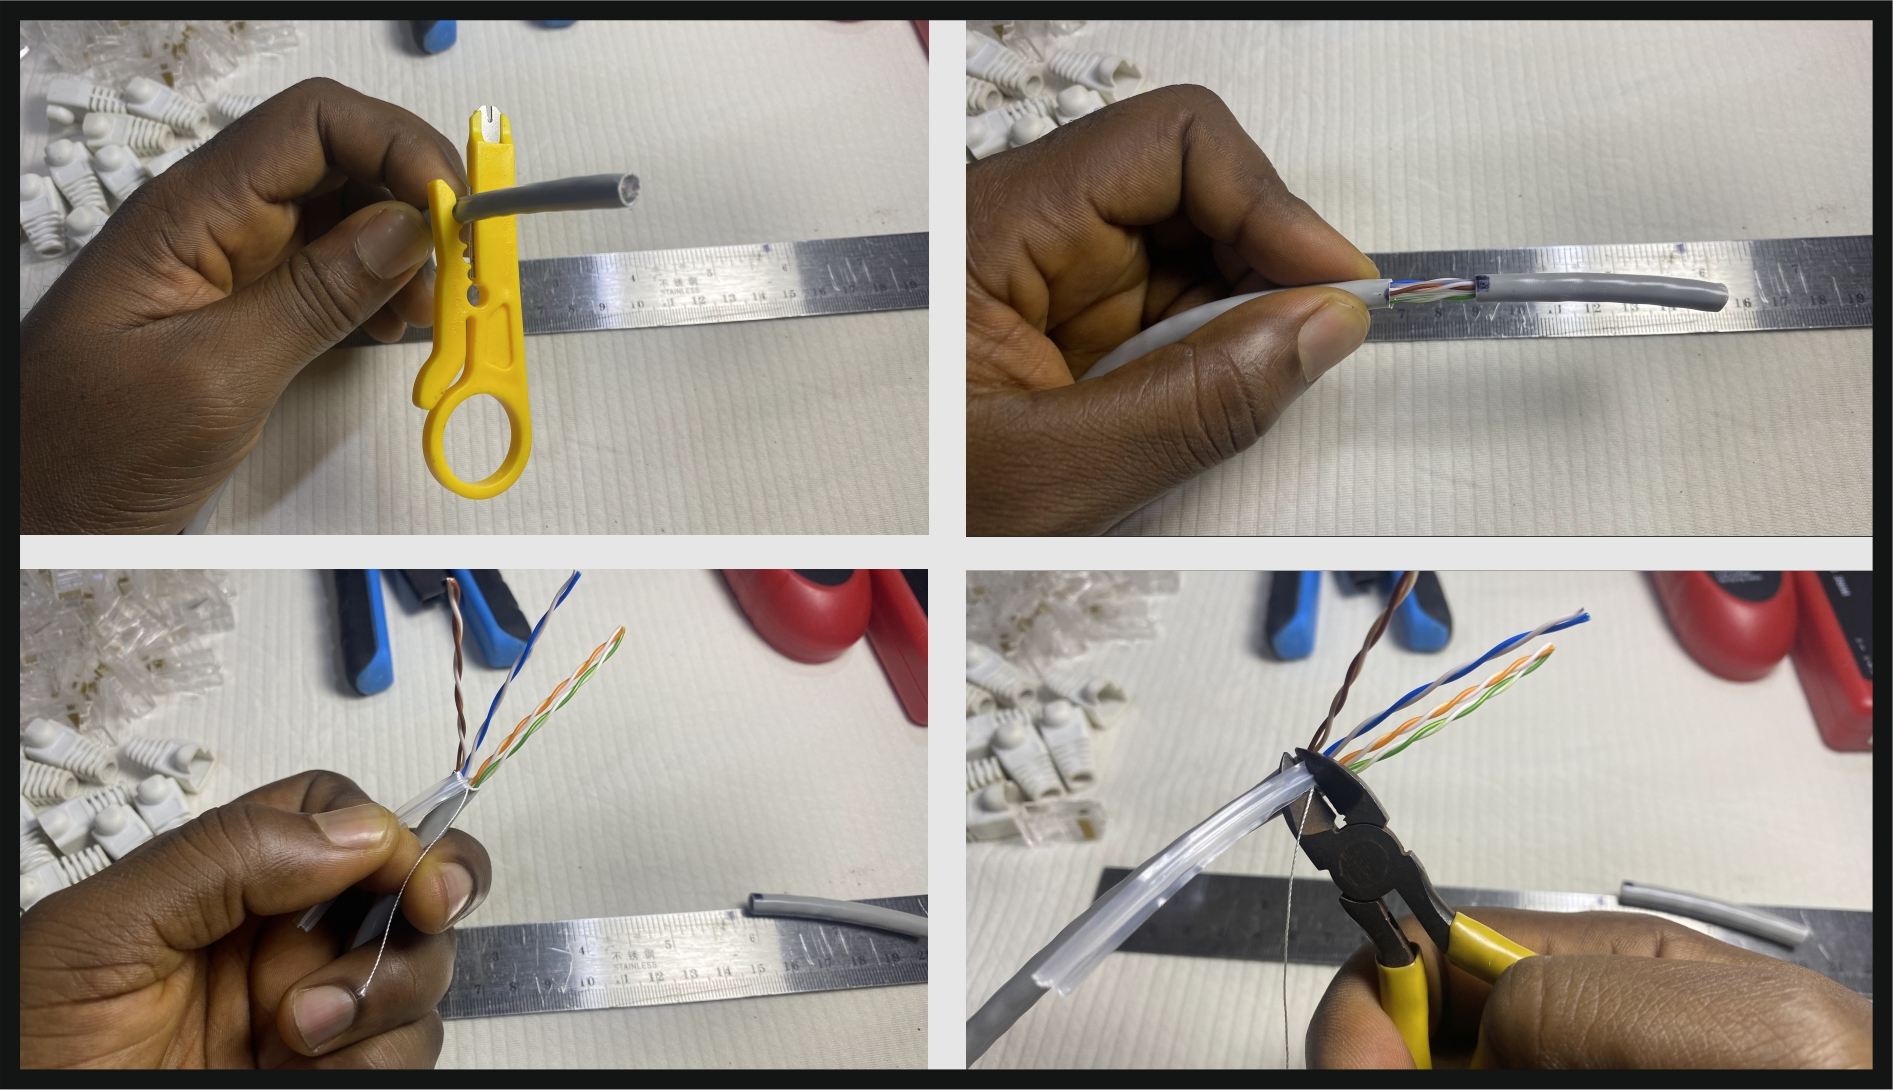
Step 1: Strip the Cable Jacket
Using your cable stripper, carefully score and remove about 1 to 1.5 inches (2.5-4 cm) of the outer PVC jacket from the end of the cable. The goal is to cut only the jacket without damaging the twisted pairs inside. Once scored, the jacket should pull off easily. If you see any nicks or cuts on the inner wires, cut off the end and start again.
Step 2: Untwist and Arrange the Wires
You will see four twisted pairs of wires. Carefully untwist them and straighten them out as much as possible. This is a critical step. Arrange the eight individual wires flat and parallel, following the T568B color code from left to right. Flatten them between your thumb and forefinger to make them manageable.
Order Check: White/Orange, Orange, White/Green, Blue, White/Blue, Green, White/Brown, Brown.
Step 3: Trim and Insert the Wires into the RJ45 Plug
Hold the flat, ordered wires tightly together. Using your sharp wire cutters, make a single, clean cut across the top, leaving about 0.5 inches (1.25 cm) of exposed wires from the edge of the PVC jacket. The end must be perfectly flush.
Now, pick up an RJ45 connector with the locking tab facing down (away from you). Carefully slide the aligned wires into the connector. Push firmly but gently until all eight wires reach the very end of the connector. You should be able to see the shiny copper tips of the wires through the transparent end of the plug.
Crucial Check: Verify that the cable jacket is pushed inside the back of the RJ45 plug. This is vital for proper strain relief.
Step 4: Crimp the Connector
Double-check the wire order one last time. Once you are certain it’s correct, insert the RJ45 plug into the appropriate slot on your crimping tool. Squeeze the handles of the crimper firmly and evenly. You should feel a distinct click as the tool pushes the gold-plated pins down, piercing the wire insulation to make contact. At the same time, it will press a plastic wedge into the cable jacket, securing it in place.
Step 5: Repeat and Test Your Cable
Repeat steps 1-4 on the other end of the cable, ensuring you use the same T568B standard. Once both ends are terminated, it’s time for the most important step: testing.
Plug both ends of your newly created cable into your Ethernet cable tester. A good tester will have a series of lights (1 through 8) that should light up in sequence on both the main unit and the remote unit. This confirms that every pin is correctly wired and there are no open circuits or shorts. If you get a pass, congratulations!
Part 4: Professional Tips for a Perfect Connection
- Minimize Untwisting: Only untwist the pairs as much as is necessary to get them into the connector. The twists are essential for preventing signal interference (crosstalk), and maintaining them as close to the termination as possible preserves signal quality.
- Double-Check Before You Crimp: A moment of verification can save a connector and a lot of rework. Always check the wire order through the transparent plug before crimping.
- Use the Right Connector: There are different RJ45 plugs for solid-core and stranded-core cables. Using the wrong type can result in a poor or failed connection. Bulk cable is typically solid-core.
- Don’t Skimp on the Tester: A simple continuity tester is good, but a more advanced tester can detect issues like split pairs that a basic tester might miss. It’s the ultimate quality control for your work.
Part 5: Why Quality Components Matter for Your Network
Creating your own Ethernet cables gives you incredible flexibility, but the reliability of that cable comes down to the quality of its parts and the precision of your work. At Dlay Cable, we dedicate ourselves to manufacturing cables and components that meet and exceed stringent industry standards. By choosing our pure copper cables and reliable connectors, you are laying the groundwork for a network that is fast, stable, and built to last.
For all your networking needs, from bulk cable and connectors for your custom projects to fully certified, pre-terminated patch cords, trust Dlay Cable to provide the professional-grade solutions that power your connections.