

In today’s connected world, a slow or unreliable internet connection can be more than just an annoyance; it can disrupt work, communication, and entertainment. While many are quick to blame their Internet Service Provider (ISP), the culprit is often closer to home: a faulty or underperforming Ethernet cable. As experts in high-performance connectivity at D-Lay Cable, we understand that the foundation of any great network is a reliable, high-quality cable. dlaycable will walk you through the exact steps to diagnose and test your Ethernet cables for both physical faults and speed bottlenecks.
Why and When Should You Test Your Ethernet Cable?
An Ethernet cable isn’t just a simple wire; it’s a precisely engineered component with eight individual conductors twisted into four pairs to prevent interference. Damage to this structure can lead to a host of problems. You should consider testing your cable if you experience:
- No Connection: The most obvious sign. Your device reports “No Cable Plugged In,” and the link lights on your router or computer port are off.
- Intermittent Drops: Your connection randomly disconnects and reconnects.
- Slow Speeds: You’re paying for 1 Gbps internet but are only getting 100 Mbps or less. This can happen when one or more wires inside the cable are damaged, forcing your hardware to negotiate a slower link speed.
- High Latency or Packet Loss: In online gaming or video calls, this manifests as lag, stuttering, or poor quality, even with high bandwidth.
Understanding Common Ethernet Cable Faults
At D-Lay Cable, we build our products to last, using 100% pure bare copper conductors and robust, snagless connectors to prevent common failures. Understanding these weak points helps in diagnosis:
- Physical Damage: Obvious cuts, severe kinks, crushed sections from being run under a door or furniture.
- Connector (RJ45) Damage: The small plastic locking tab can break off, leading to a loose connection. The gold-plated pins inside can also get bent, corroded, or pushed in. Our snagless boot design helps protect this critical component from damage.
- Internal Wire Breaks: A wire inside the sheathing can break due to repeated flexing or sharp bends. This is often invisible from the outside.
- Incorrect Wiring (Bad Termination): If the cable was manually terminated, the pins might not follow the correct T568A or T568B wiring standard, causing opens, shorts, or split pairs which severely degrade performance.
Method 1: The Quick Visual Inspection
This is your first line of defense. It’s simple, fast, and can often identify the problem immediately. Unplug the cable from both ends and carefully examine its entire length.
- Check the Connectors: Look at the RJ45 plugs on both ends. Is the plastic locking tab intact? Are any of the eight small pins bent, recessed, or missing?
- Inspect the Cable Jacket: Look for any deep cuts, abrasions, or areas where the cable has been crushed flat. Pay close attention to sections that go around corners or under carpets.
- Examine the Bend Radius: Are there any extremely sharp kinks or bends in the cable? A bend tighter than four times the cable’s diameter can cause internal damage.
If you find obvious damage, the choice is clear: the cable must be replaced.
Method 2: The Substitution Test (The “Known-Good” Method)
This is the most practical test for most home users. The principle is simple: replace the suspect cable with a cable that you know works perfectly.
- Find a “Known-Good” Cable: Grab an Ethernet cable from a device that is currently working without issue. For best results, use a high-quality, factory-terminated cable, like one of our Fluke-tested Cat6 or Cat6A patch cords, to ensure your test isn’t compromised by another low-quality cable.
- Swap the Cables: Use this known-good cable to connect the two devices that were having issues.
- Observe the Result: If your connection is immediately restored and performance returns to normal, you’ve confirmed the original cable is faulty. If the problem persists, the issue likely lies with your router, computer port, or ISP, not the cable.
Method 3: Using a Dedicated Cable Tester (The Professional’s Choice)
For definitive results, nothing beats a dedicated testing tool. These devices send signals through the cable to check for physical integrity and correct wiring. We offer a range of these tools at D-Lay Cable, suitable for everyone from DIYers to network professionals.
Types of Testers:
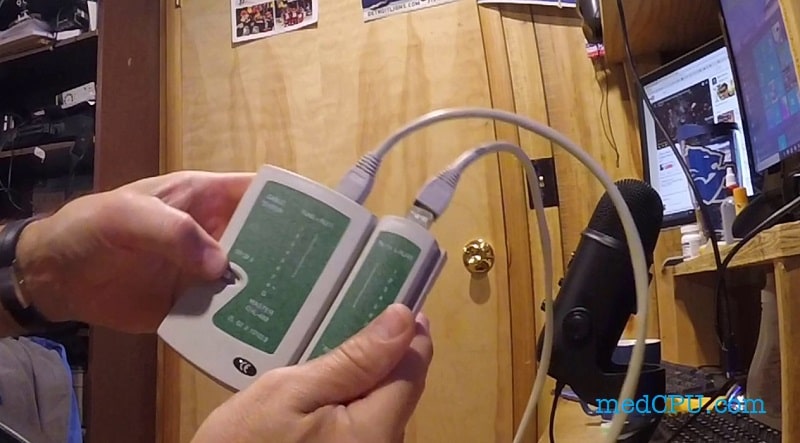
- Continuity Testers: These are the most basic and affordable type. They consist of two units: a main tester and a remote. You plug each end of the cable into a unit, and a series of lights (typically 1 through 8) will illuminate in sequence. If any light fails to illuminate or lights up out of order, it indicates a fault (like an open, short, or crossed wire).
- Wiremappers: A step up from basic testers, these devices provide more detail about the fault, such as identifying a “split pair,” which a simple continuity tester might miss. Split pairs are a major cause of performance degradation and crosstalk.
- Cable Certifiers: This is the gold standard used by professionals. A certifier doesn’t just check the wiring; it performs a battery of tests to measure performance against industry standards (like TIA/EIA for Cat6). It measures crosstalk, attenuation, return loss, and more, providing a definitive “Pass” or “Fail” grade. This is how we guarantee the performance of our premium Cat7 and Cat8 cables, ensuring they meet their specified speeds and frequencies.
Method 4: Testing for Speed and Performance Bottlenecks
Sometimes a cable isn’t “broken” but is underperforming, creating a bottleneck. This is how you test for speed specifically.
Step 1: Check Your Negotiated Link Speed
Your computer and router “negotiate” the fastest possible connection speed. You can check what they’ve agreed upon.
- On Windows: Go to
Settings > Network & Internet > Ethernet. Click on your Ethernet connection, and look for “Link speed (Receive/Transmit)”. It should show 1000/1000 Mbps (1 Gbps) for a modern network. If it shows 100/100 Mbps, your cable might be the issue. - On macOS: Go to
System Settings > Network, select your Ethernet connection, and click “Details…”. Under the “Hardware” tab, you will see the “Speed”.
Step 2: Use a Local Network Speed Test Tool (iPerf3)
Online speed tests (like Ookla) measure your internet speed, not your local network speed. To test the cable itself, you need to test the speed between two computers on your own network. The best tool for this is iPerf3.
- Setup: You’ll need two computers on the same network, connected via the cable you want to test (e.g., connected to the same router). Install iPerf3 on both.
- Run the Test: Designate one computer as the “server” and run the command
iperf3 -s. On the second computer (the “client”), run the commandiperf3 -c [IP_ADDRESS_OF_SERVER]. - Analyze Results: iPerf3 will transfer data between the two machines for 10 seconds and report the bandwidth. For a Gigabit network, you should see results around 940 Mbps. If it’s significantly lower (e.g., 95 Mbps), it confirms a bottleneck in your local network, very likely caused by the cable.
Conclusion: Your Network is Only as Strong as Its Weakest Link
Testing your Ethernet cables is a critical troubleshooting step that can save you time and frustration. By following these methods—from a simple visual check to a professional iPerf3 test—you can accurately diagnose whether your cable is at fault.
When it’s time to replace a faulty cable or upgrade your network for better performance, don’t compromise. A high-quality, certified cable is an investment in reliability and speed. At D-Lay Cable, we are committed to providing superior connectivity solutions, from our robust, high-purity copper Ethernet cables to the professional tools you need to maintain your network. Ensure your connection is never the weak link in your digital life.