

At D-Lay Cable, we are experts in engineering and manufacturing high-performance network infrastructure. We understand that a reliable network is built from the ground up, starting with the quality of every single component. While we provide a vast range of pre-terminated patch cables for convenience and certified performance, we also champion the professionals and enthusiasts who want to build their own. Creating custom-length Cat5e patch cables is a valuable skill that offers unparalleled flexibility, cost savings for large projects, and a deeper understanding of your network’s physical layer.
dlaycable leverages our manufacturing expertise to walk you through the process, ensuring you create cables that are not just functional, but reliable. Let’s get started.
Table of Contents
- Part 1: Gearing Up – Your Essential Toolkit & Materials
- Part 2: The Blueprint – Understanding T568A vs. T568B Wiring Standards
- Part 3: The Build – A Step-by-Step Guide to Assembling Your Cable
- Part 4: The Final Check – Testing for a Perfect Connection
- Part 5: Troubleshooting Common Mistakes
- Conclusion: Why Quality Components Are the Foundation of a Great DIY Cable
Part 1: Gearing Up – Your Essential Toolkit & Materials
A successful outcome begins with the right equipment. Using subpar tools or materials can lead to frustration and poor performance. As a manufacturer, we can’t stress this enough: quality in, quality out. Here’s what you’ll need.
The Tools of the Trade
- Bulk Cat5e Cable: This is your raw material. A quality cable from a reputable source like D-Lay Cable will have a durable jacket, properly twisted pairs, and pure copper conductors, which are essential for signal integrity.
- RJ45 Connectors: These are the plastic plugs at each end. Ensure you get connectors designed for Cat5e solid or stranded cable, depending on what bulk cable you purchased.
- Crimping Tool: This is the most critical tool. A good crimper will simultaneously push the pins into the wires and secure the cable to the connector. Don’t skimp here; a cheap crimper can result in bad connections.
- Cable Stripper/Cutter: While many crimpers have a built-in stripper and cutter, a dedicated tool often provides more precision, reducing the risk of nicking the delicate inner wires.
- Network Cable Tester: This is a non-negotiable final step. A tester verifies that all eight pins are correctly wired and that there are no shorts. It’s the only way to be 100% certain your cable is perfect.
Part 2: The Blueprint – Understanding T568A vs. T568B Wiring Standards
Before you touch a wire, you must understand the “wiring standard” or “pinout.” There are two recognized standards for terminating Ethernet cables: T568A and T568B. A standard “straight-through” cable, used for connecting a computer to a switch or router, will have the same standard on both ends.
T568B is the most common standard used in modern networks. For consistency and to avoid confusion, we recommend using T568B for all your new cables.
Here is the color code for each, viewed with the RJ45 connector tab facing down and the copper pins facing you:
Pinout Comparison (Left to Right)
| Pin | T568B (Recommended) | T568A |
|---|---|---|
| 1 | White/Orange | White/Green |
| 2 | Orange | Green |
| 3 | White/Green | White/Orange |
| 4 | Blue | Blue |
| 5 | White/Blue | White/Blue |
| 6 | Green | Orange |
| 7 | White/Brown | White/Brown |
| 8 | Brown | Brown |
Key takeaway: Pick one standard (we strongly suggest T568B) and use it for both ends of your cable.
Part 3: The Build – A Step-by-Step Guide to Assembling Your Cable
With your tools ready and your standard chosen, it’s time to build. Follow these steps carefully for a perfect termination.
- Measure and Cut: Measure the length of cable you need and add a few extra inches to be safe. Use your crimper’s cutting blade or a dedicated cutter for a clean, straight cut.
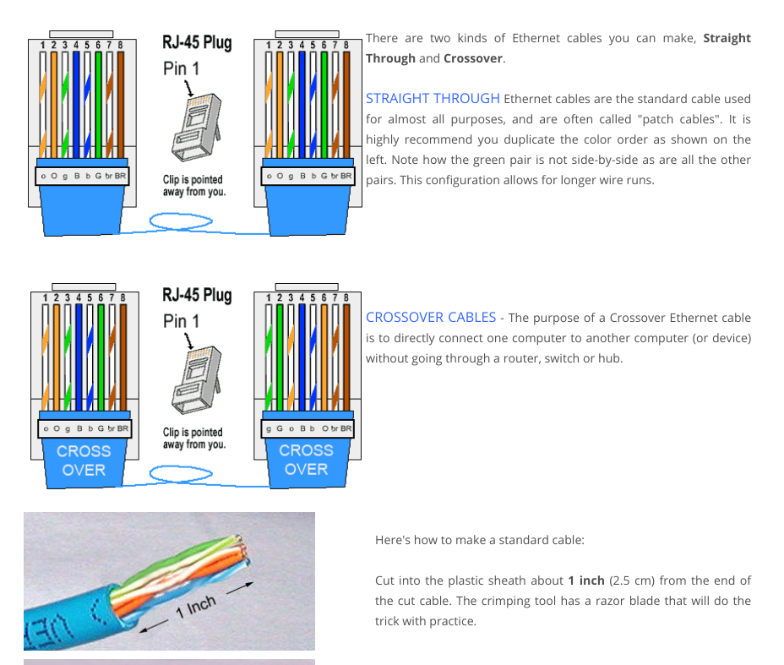
- Strip the Outer Jacket: Carefully insert the end of the cable into your stripping tool and strip back about 1 inch (2.5 cm) of the outer plastic jacket. The goal is to score and remove the jacket without cutting or nicking the twisted pairs inside.
- Expose and Untwist the Wires: You’ll see four twisted pairs of wires. Some cables may also have a plastic spline or a rip cord; you can trim these flush with the jacket. Carefully untwist each pair and begin to straighten them out. Pro Tip: Use the sheath of an untwisted wire to run along the kinks of another to help straighten it.
-
Arrange the Wires: This is the most crucial step. Arrange the eight wires in the correct order according to the T568B standard (or T568A, if you chose that). Get them side-by-side in a flat, ribbon-like formation.
T568B Order: White/Orange, Orange, White/Green, Blue, White/Blue, Green, White/Brown, Brown. - Trim and Insert: Pinch the ordered wires tightly to keep them flat and in sequence. Trim them so that you have about 1/2 inch (1.25 cm) of wire extending from the jacket. The cut must be perfectly straight. Now, keeping the wires flat and in order, slide them into the RJ45 connector with the clip facing down. Push firmly until all wires hit the end of the connector.
- Visual Inspection: Look through the transparent top of the connector. You should see eight copper wires fully seated at the end. Also, check that the cable jacket is pushed far enough into the connector to be secured by the crimp’s strain relief latch.
- Crimp the Connector: Insert the RJ45 connector into the appropriate slot on your crimping tool. Squeeze the handles firmly and evenly. You should hear a ‘click’ as the strain latch is secured and the copper pins are pushed through the insulation to make contact with the wires.
- Repeat for the Other End: Now, do the exact same process for the other end of the cable, ensuring you use the same wiring standard.
Part 4: The Final Check – Testing for a Perfect Connection
Never assume your cable is good. A network cable tester is an inexpensive tool that saves immense time and headaches. Plug both ends of your newly made cable into the tester. Turn it on. A good tester will have a series of lights (1 through 8) that light up in sequence on both the main and remote units. If they all light up green and in order, you have a successful, working straight-through cable!
Part 5: Troubleshooting Common Mistakes
- Test Fails (Lights out of order): The most common issue. You’ve mixed up the wire order. Unfortunately, the only fix is to cut the connector off and start over. Double-check your color code!
- Test Fails (Light doesn’t turn on): A wire isn’t making a connection. This is usually because it wasn’t pushed all the way into the connector before crimping, or the crimp was too weak. Cut and re-terminate.
- Loose Connector: The cable jacket wasn’t pushed far enough into the connector. The crimp’s strain latch didn’t grab the jacket, meaning the delicate wires are taking all the strain. This cable will fail over time. It’s best to remake it.
Conclusion: Why Quality Components Are the Foundation of a Great DIY Cable
Congratulations! You’ve just acquired a skill that puts you in control of your network’s physical infrastructure. You can create clean, custom-length cables for your home office, media center, or server rack.
Remember, the guide you just followed is only part of the equation. The long-term performance and reliability of your handcrafted cable depend entirely on the quality of its components. At D-Lay Cable, we manufacture bulk cable, connectors, and tools to the highest industry standards (UL, ETL, RoHS). By choosing professional-grade materials, you ensure your DIY effort results in a cable that delivers stable, high-speed performance for years to come. Your network deserves nothing less.