

Creating a high-performance network is about more than just buying fast equipment. The quality of your infrastructure, down to each individual connection, is paramount. A poorly terminated network cable can bottleneck your entire system, leading to slow speeds, data loss, and frustrating connectivity issues. As manufacturers of premium network cabling, we at Dlay Cable believe in empowering our partners and customers with the knowledge to build reliable, high-speed networks. That foundation is built one perfect connection at a time.
This comprehensive guide will walk you through the professional method for terminating a Cat6 Ethernet cable with an RJ45 connector. Follow these steps to ensure every cable you make meets the highest standards for performance and reliability.
Article Directory
Before You Begin: Tools and Materials
Gathering the right tools and materials is the first step to success. Using quality components will not only make the job easier but will also ensure a durable, high-performance final product.
Tools You’ll Need
- Cat6 Crimping Tool: A quality crimper is essential. It will securely press the connector’s pins into the wires and clamp the cable strain relief.
- Cable Stripper/Cutter: While some crimpers have a built-in stripper, a dedicated tool provides more control and reduces the risk of nicking the inner wires.
- Flush Cutters or Networking Scissors: For making a clean, straight cut of the arranged wires.
- Cable Tester: A non-negotiable tool for professionals. It verifies that all wires are in the correct order and making a solid connection.
Materials
- High-Quality Cat6 Cable: The backbone of your connection. Using a well-constructed cable, like those from Dlay Cable, ensures better performance and durability. Our cables feature pure copper conductors and robust jackets.
- Cat6 RJ45 Connectors: Ensure your RJ45 plugs are specifically rated for Cat6. They are designed to accommodate the thicker wires and often feature a load bar or staggered design to reduce crosstalk.
The Crucial Choice: T568B vs. T568A Wiring Standards
Before you cut a single wire, you must decide which wiring standard to use. There are two standards recognized by TIA/EIA: T568A and T568B. While both are functionally equivalent, T568B is the more prevalent standard in commercial and residential networks today.
The most important rule: Be consistent. Use the same standard on both ends of a cable and across your entire network installation to avoid connectivity problems.
- T568B Pinout (Most Common): Orange/White, Orange, Green/White, Blue, Blue/White, Green, Brown/White, Brown
- T568A Pinout: Green/White, Green, Orange/White, Blue, Blue/White, Orange, Brown/White, Brown
For this guide, we will proceed using the T568B standard.
Step-by-Step Guide to Terminating Cat6 Cable (T568B)
With your tools, materials, and chosen standard ready, it’s time to create a perfect connection.
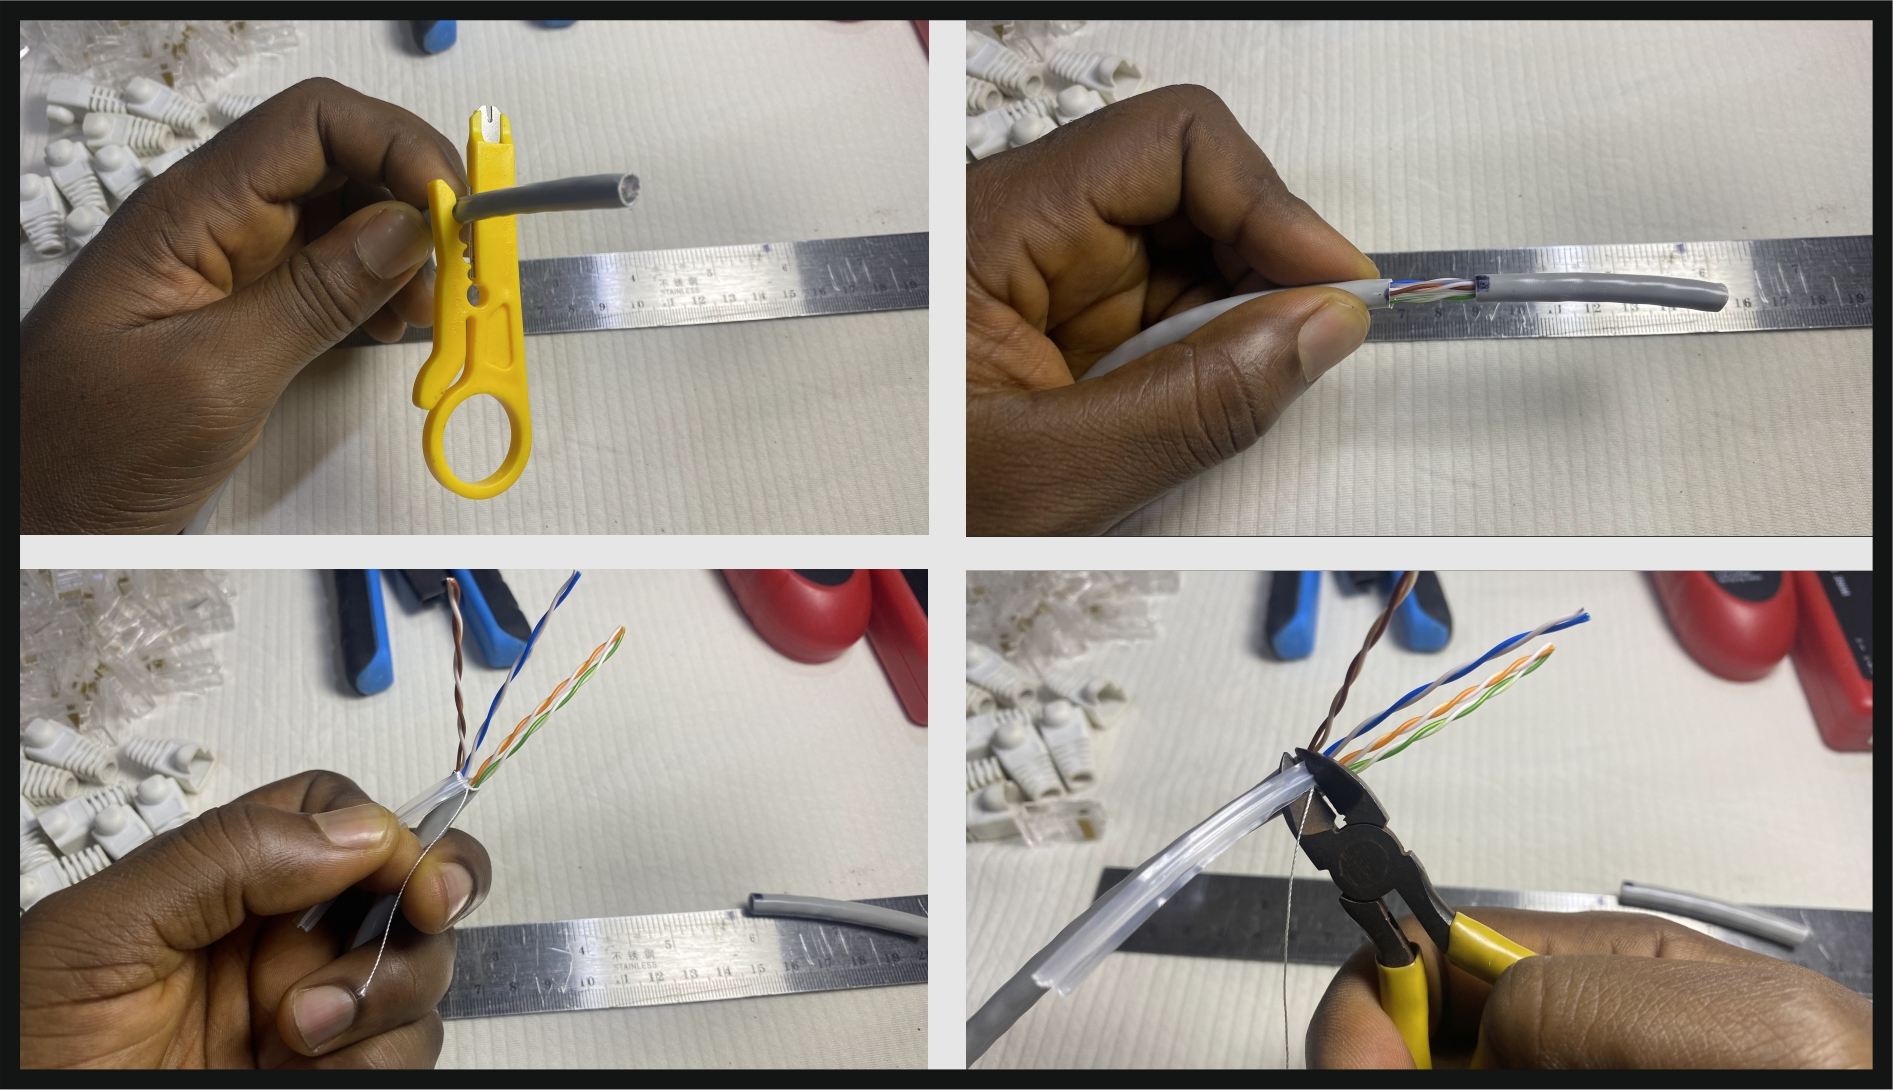
Step 1: Strip the Cable Jacket
Using your cable stripper, carefully score and remove about 1 inch (25mm) of the outer cable jacket. Be careful not to cut too deep, as you risk nicking the insulation of the twisted pairs inside. Once scored, the jacket should pull off easily.
Step 2: Expose and Untwist the Wires
Inside the jacket, you’ll see four twisted pairs of wires and a plastic spline (pair separator). Cut and remove the spline as close to the jacket as possible. Also, trim the rip cord if present. Carefully untwist each pair back to the base of the jacket. The goal is to keep the wires twisted for as long as possible to minimize “crosstalk” (signal interference).
Step 3: Arrange the Wires (T568B Standard)
This is the most critical step. Flatten the wires and arrange them side-by-side in the T568B color order, from left to right:
Orange/White -> Orange -> Green/White -> Blue -> Blue/White -> Green -> Brown/White -> Brown
Double-check the order. Then, check it again. A single wire out of place will cause the cable to fail.
Step 4: Flatten, Align, and Trim
Hold the ordered wires tightly between your thumb and forefinger. Flatten them to ensure they are perfectly aligned in a neat, flat row. Using your flush cutters, trim the wires so that only about 1/2 inch (12-13mm) of colored wire extends from the cable jacket. The cut must be perfectly straight and clean.
Step 5: Insert Wires into the RJ45 Connector
Hold the RJ45 connector with the locking tab facing down and the pin openings facing you. Carefully and slowly slide the flat row of wires into the connector. Each wire should slide into its own channel. Push firmly until the wires reach the very end of the connector. You should be able to see the shiny copper ends through the tip of the connector. Crucially, the cable’s outer jacket should be pushed inside the connector by at least 1/4 inch (6mm) to be secured by the strain-relief clamp.
Step 6: Crimp the Connector
Place the RJ45 connector into the appropriate slot on your crimping tool. Squeeze the handles firmly and evenly. You should hear a click as the tool pushes the gold-plated pins through the wire insulation, making a solid connection. The tool will also press down the strain-relief clamp onto the cable jacket, securing the cable and preventing stress on the individual wires.
The Final Step: Always Test Your Cable
Never assume a cable is good. A professional always tests. Plug both ends of your newly terminated cable into a network cable tester. A good tester will check each of the 8 pins for continuity and verify they are in the correct order. A “Pass” light with sequential pin indicators (1 through 8) means you have a perfect cable, ready for deployment.
Pro-Tips for Perfect Termination & Common Mistakes
Pro-Tips
- Maintain the Twists: Minimize the amount of untwisted wire to no more than 1/2 inch (13mm). This is critical for maintaining Cat6 performance and preventing crosstalk.
- Check Twice, Crimp Once: Always double-check your wire order before crimping. An RJ45 connector can only be crimped once.
- Use the Right Plug: Ensure your RJ45 plugs are rated for Cat6 and are compatible with the type of cable you are using (solid or stranded conductor).
Common Mistakes to Avoid
- Jacket Not Secured: If the outer jacket is not pushed far enough into the connector, the strain-relief clamp will not secure it, leading to a weak and unreliable cable.
- “Shiners” or Wires Not Seated: If the wires are not pushed all the way to the end of the connector, the pins will not make a proper connection. Look for the copper ends at the tip of the plug before crimping.
- Nicked Wires: Being too aggressive with the cable stripper can damage the inner wires, creating an immediate or future point of failure.
Your Foundation for a High-Performance Network
A flawless termination is only as good as the cable it’s on. At Dlay Cable, we manufacture networking cables and accessories with the professional installer in mind. Our Cat6 cables feature 100% pure copper conductors for maximum signal integrity, robust jackets to withstand pulling, and consistent internal construction that makes termination easier and more reliable. By starting with a superior product, you ensure that the time and skill you invest in creating perfect connections result in a network that performs at its peak potential, day in and day out.
For your next project, build with confidence. Build with Dlay Cable.