

At D-Lay Cable, we understand that the backbone of any high-performance network isn’t just the quality of the cable, but the integrity of every connection. As a leading manufacturer of high-quality, Fluke-tested network cables and components, we’ve seen firsthand how a poorly terminated cable can undermine an entire system. A perfect crimp is the final, critical step in ensuring the speed and reliability you expect from your Cat6 infrastructure.
dlaycable is designed to walk you through the process, just as our own technicians would do it. Whether you’re a professional installer or a dedicated DIYer, mastering this skill is essential. Let’s get started.
Why Proper Termination Matters
Before we touch a tool, it’s crucial to understand why this process is so important. A Cat6 cable is precisely engineered with twisted pairs to cancel out electromagnetic interference (EMI) and reduce crosstalk (unwanted signal transfer between pairs). A sloppy termination can undo all of that engineering by:
- Increasing Crosstalk: Untwisting the pairs too far back from the connector introduces noise and degrades performance.
- Creating Signal Loss: Poor contact between the copper wires and the connector pins leads to data loss and retransmissions.
- Causing Connection Failures: Wires in the wrong order or an unsecured plug will result in a connection that simply doesn’t work.
Using a high-quality, UL-certified cable like those from D-Lay Cable is the first step. Proper termination is the second, ensuring you get the full gigabit speeds and bandwidth that Cat6 promises.
Choosing Your Wiring Standard: T568A vs. T568B
There are two recognized standards for wiring Ethernet cables: T568A and T568B. While functionally identical, T568B is the most common standard used in commercial and residential networks today. The most important rule is consistency. If you’re creating a standard “straight-through” cable (for connecting a computer to a switch, for example), both ends must be terminated with the same standard.
For this guide, we will use the T568B standard.
T568B Pinout (Left to Right, with the connector tab facing down):
- Orange/White
- Orange
- Green/White
- Blue
- Blue/White
- Green
- Brown/White
- Brown
Gathering Your Tools & Materials
Having the right tools and materials is non-negotiable for a clean, professional job. A great network is built with quality components from start to finish.
Essential Materials from D-Lay Cable:
- High-Quality Cat6 Bulk Cable: Our Cat6 cables feature 23 AWG solid copper conductors and are Fluke-tested to ensure performance. The internal spline (separator) is key to reducing crosstalk.
- Cat6 RJ45 Connectors: It’s critical to use connectors specifically designed for Cat6. These often have staggered pins or a load bar to accommodate the thicker wires and maintain pair separation.
Essential Tools:
- Cable Crimping Tool: A quality crimper will securely press the pins and clamp the cable strain relief.
- Cable Stripper: A dedicated stripper removes the outer jacket without nicking the inner conductors.
- Flush Cutters or Electrician’s Scissors: For a clean, straight cut of the conductors.
- Network Cable Tester: This is the only way to be 100% certain your termination is correct and the connection is good.
The Crimping Process: A Visual Step-by-Step Guide
Follow these steps carefully. The “visual” part is key—always look closely at your work at each stage before moving to the next.
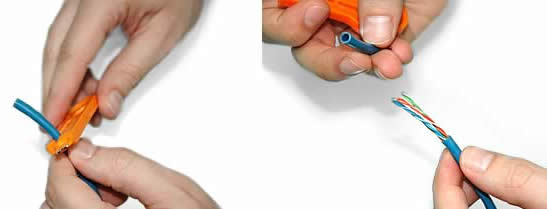
Step 1: Strip the Outer Jacket
Using your cable stripper, insert the Cat6 cable and score the outer jacket about 1.5 inches (4 cm) from the end. Rotate the tool once or twice—don’t press too hard. The goal is to cut the jacket, not the wires inside. Bend the cable at the score mark and slide the piece of jacket off. You should see the four twisted pairs, a spline (plastic divider), and possibly a rip cord.
Visual Check: Inspect the inner wires to ensure none of them have been nicked or cut. If they have, cut off the end and start again.
Step 2: Prepare the Wires
First, use your flush cutters to snip off the plastic spline and any rip cord as close to the jacket as possible. Then, begin untwisting the four pairs of wires. Try to limit untwisting to only what’s necessary, as maintaining the twists as close to the connector as possible is key for performance. Separate the eight individual wires.
Visual Check: You should now have eight separate, color-coded wires ready for arrangement.
Step 3: Arrange the Wires (T568B Standard)
This is the most critical step for a functional cable. Flatten the wires and arrange them side-by-side in the T568B color order, from left to right:
Orange/White, Orange, Green/White, Blue, Blue/White, Green, Brown/White, Brown.
Hold them tightly between your thumb and forefinger to keep them in a flat, ribbon-like formation. This may take a few tries to get right.
Visual Check: Double and triple-check the color order. It’s the most common point of failure.
Step 4: Flatten, Straighten, and Trim
Keeping the wires in the correct order, continue to flatten and straighten them. The flatter they are, the easier they will slide into the connector. Once they are perfectly aligned, use your flush cutters to trim the ends. You want a clean, straight cut, leaving about 1/2 inch (13 mm) of wire exposed from the cable jacket.
Visual Check: The ends of the eight wires should be perfectly flush and even. The jacket should be close enough to be gripped by the connector’s strain relief later.
Step 5: Insert Wires into the RJ45 Connector
Carefully hold the arranged wires and the RJ45 connector with the locking tab facing down. Gently slide the flat ribbon of wires into the connector. Each wire should slide into its own dedicated channel. Push firmly until the wire ends are pressed against the very front of the connector.
Visual Check: Look through the clear top of the connector. You should see 8 copper tips, one for each wire, at the very end. Also, check the color order one last time. Ensure the cable jacket is pushed far enough into the connector to be secured by the strain relief clamp during crimping.
Step 6: Crimp the Connector
Insert the wired RJ45 connector into the appropriate slot on your crimping tool (usually marked 8P/RJ45). Squeeze the handles of the crimper firmly and completely. You should hear and feel a “click”. This action does two things simultaneously: it pushes the gold-plated pins down to pierce the wire insulation and make contact with the copper, and it secures the plastic strain-relief clamp onto the cable jacket.
Visual Check: Remove the cable. The gold pins should now be flush with the connector surface. The strain relief should be firmly clamped down on the cable’s outer jacket, not the bare wires.
Step 7: Test Your Cable!
The final and most important step is testing. Plug both ends of your newly terminated cable into a network cable tester. A good tester will check each of the 8 pins for continuity and proper pairing. It will instantly tell you if you’ve made a mistake (like crossed wires or a bad connection). A “Pass” light means you’ve succeeded!
Visual Check: The tester should show a 1-to-1 connection for all 8 pins, lighting up sequentially on both the main and remote units.
Pro Tips from D-Lay Cable Experts
- Minimize Untwisting: We can’t stress this enough. The TIA/EIA standard specifies that wires should not be untwisted more than 0.5 inches (13 mm) before termination. This is the single biggest factor in passing Cat6 performance tests.
- Use the Right Components: Never use a Cat5e connector on a Cat6 cable. Cat6 wires are thicker, and the connector is designed to accommodate them while maintaining performance. Our precision-engineered RJ45 connectors are designed to pair perfectly with our cables.
- Practice Makes Perfect: Your first few terminations might not be perfect. Don’t be discouraged. It’s a skill that improves with repetition.
- A Tester is Not Optional: For any professional or serious installation, a cable tester is a mandatory tool. It turns guesswork into certainty.
Conclusion: Building Connections That Last
Congratulations! You now have the knowledge to create a professional, high-performance Cat6 Ethernet cable. By combining meticulous technique with superior materials, you ensure that your network’s physical layer is robust, reliable, and ready for high-speed data.
For a truly professional-grade network, the quality of your components is non-negotiable. At D-Lay Cable, we pride ourselves on providing OEM/ODM solutions and a full range of UL-certified Cat6 cables, precision RJ45 connectors, and professional tools to ensure your connections are perfect, every time. Build your network on a foundation of quality.