

As experts in high-performance cabling at Dlay Cable, we understand that a network is only as strong as its weakest link. While pre-made patch cords are convenient, learning to terminate your own Cat5e Ethernet cables offers unparalleled advantages in customization, cost-effectiveness for large projects, and ensuring a perfect fit for every installation. A well-made cable provides a reliable, high-speed connection for your home or business network.
This comprehensive guide will walk you through the professional process of creating a standard T-568B straight-through network cable, the most common type used today. Follow these steps to craft connections you can count on.
Article Contents
- Part 1: Gathering Your Tools & Materials
- Part 2: Understanding the T-568A vs. T-568B Wiring Standards
- Part 3: The Step-by-Step Guide to Making Your Cat5e Cable
- Part 4: The Final, Crucial Step: Testing Your Cable
- Part 5: Pro Tips for Perfect Terminations
- Part 6: Your Project, Our High-Quality Supplies
Part 1: Gathering Your Tools & Materials
Before you begin, assembling the right tools and high-quality materials is essential. Using subpar components can lead to signal loss, connection drops, and frustration. Here’s what you’ll need:
- Bulk Cat5e Cable: For the best performance and PoE (Power over Ethernet) capability, we strongly recommend using a cable with solid pure copper conductors, not Copper Clad Aluminum (CCA). Choose UTP (Unshielded Twisted Pair) for most indoor environments.
- RJ45 Connectors: These are the standard modular plugs for Ethernet. Ensure they are specifically designed for Cat5e solid or stranded cable, whichever you are using.
- Crimping Tool: A quality crimper not only secures the RJ45 plug to the cable but also presses the pins into the wires to establish a connection. Many models also include a built-in cable cutter and stripper.
- Cable Stripper or Cutters: While many crimpers have a stripper, a dedicated tool can offer more precision, helping you avoid nicking the inner wires.
- Network Cable Tester: This is a non-negotiable tool for professionals. A tester verifies that all eight wires are correctly connected and that there are no shorts, ensuring your cable will work flawlessly.
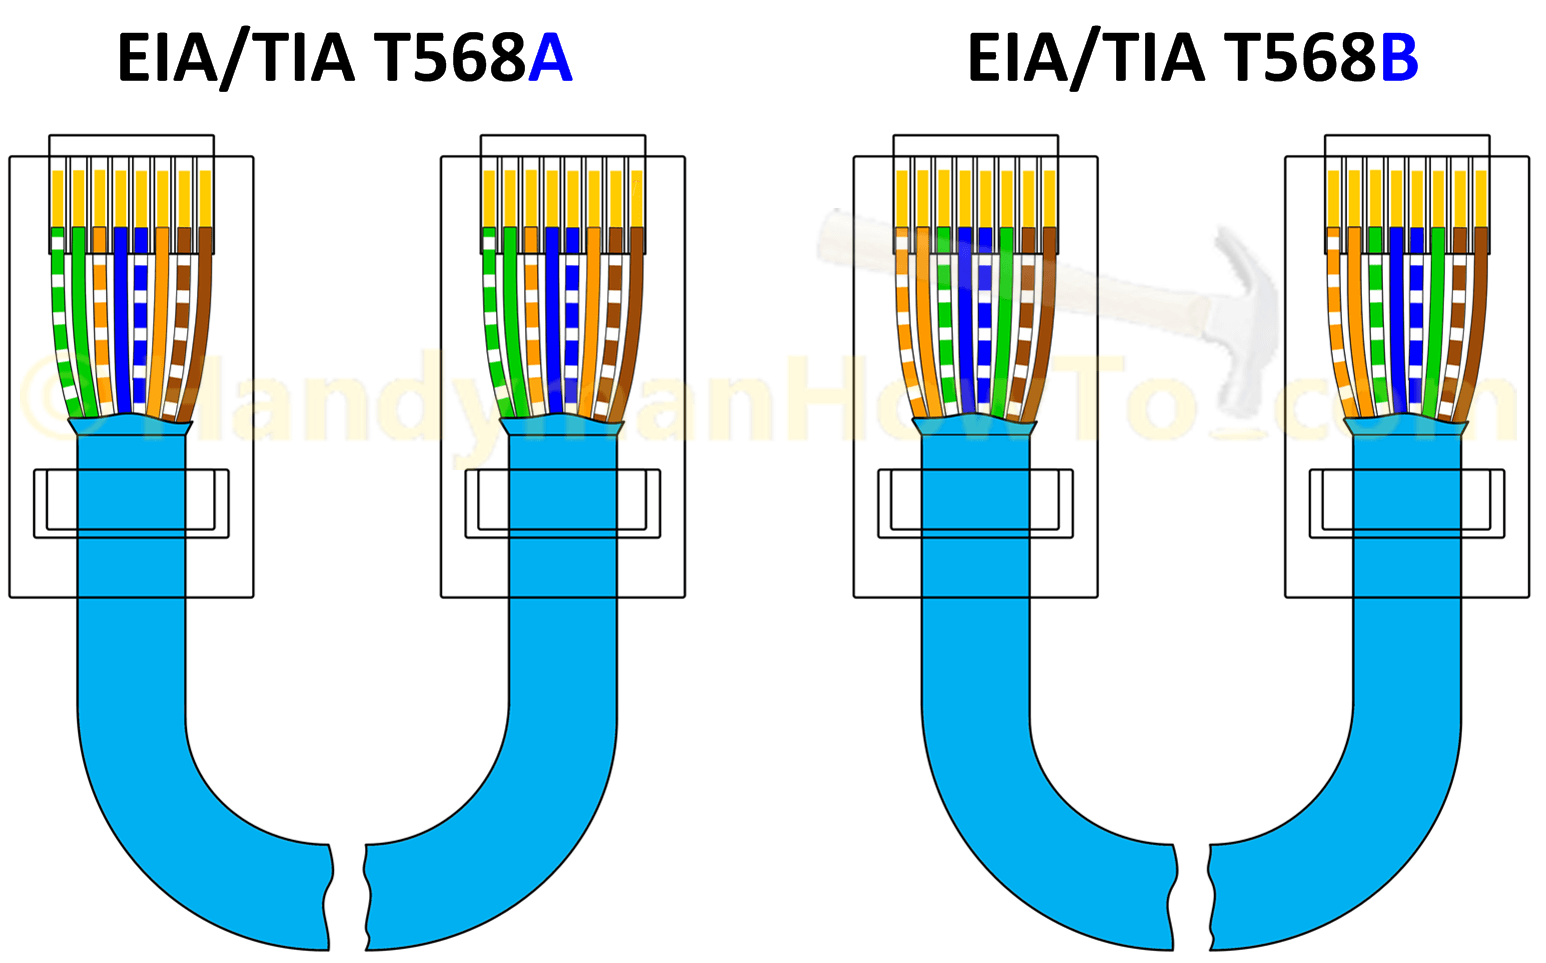
Part 2: Understanding the T-568A vs. T-568B Wiring Standards
Inside an Ethernet cable are eight wires, organized into four twisted pairs. To make a functional cable, these wires must be inserted into the RJ45 connector in a specific order. There are two official standards recognized by the TIA/EIA: T-568A and T-568B.
- Straight-Through Cable (Most Common): Both ends of the cable use the same standard (e.g., T-568B on End 1 and T-568B on End 2). This is used to connect a computer to a switch, hub, or router.
- Crossover Cable (Rarely Needed): Each end of the cable uses a different standard (T-568A on one end, T-568B on the other). This was once used to connect two computers directly, but modern network devices have auto-MDI/MDIX technology that makes these cables largely obsolete.
For all modern network installations, you should use the T-568B standard for straight-through cables. It is the most prevalent and commercially used standard in the United States and worldwide.
The T-568B Color Code
Holding the RJ45 connector with the tab facing down and the copper pins facing up and away from you, the wire order from left to right (Pin 1 to Pin 8) is:
- Orange/White
- Orange
- Green/White
- Blue
- Blue/White
- Green
- Brown/White
- Brown
Part 3: The Step-by-Step Guide to Making Your Cat5e Cable
With your tools ready and the T-568B color code in mind, you’re ready to begin.
Step 1: Strip the Outer Jacket
Carefully use your cable stripper to score and remove about 1 inch (2.5 cm) of the outer PVC jacket from the end of the cable. Be very careful not to cut or nick the twisted pairs inside. Once scored, the jacket should pull off easily.
Step 2: Expose and Untwist the Wires
You will see four twisted pairs of wires. Separate the pairs. Then, carefully untwist each pair so you have eight individual wires. Try to keep the twists intact as close to the jacket as possible, as the twists are crucial for preventing signal interference.
Step 3: Arrange the Wires (The T-568B Pattern)
This is the most critical step. Flatten and arrange the eight wires side-by-side in the T-568B color order mentioned above. From left to right: Orange/White, Orange, Green/White, Blue, Blue/White, Green, Brown/White, Brown.
Step 4: Flatten, Align, and Trim the Wires
Pinch the aligned wires tightly between your thumb and forefinger to keep them flat and in the correct order. The group of wires should be perfectly flat and parallel. Using your crimper’s cutting blade, make a clean, straight cut across the wires, leaving about 1/2 inch (1.25 cm) of wire exposed from the main jacket.
Step 5: Insert the Wires into the RJ45 Connector
Hold the RJ45 connector with the tab down and pins facing up. Keeping the wires flat and in order, gently push them into the connector until they hit the front wall. Double-check the color order through the clear plastic. The outer cable jacket should also be pushed inside the back of the connector to provide strain relief.
Step 6: Crimp the Connector
Insert the connector into the appropriate slot on your crimping tool. Squeeze the handles firmly and completely. This action does two things: it pushes the copper pins down to pierce the wire insulation and make contact, and it secures the cable jacket at the base of the connector. You should hear a satisfying click.
Step 7: Repeat for the Other End
Now, simply repeat steps 1-6 for the other end of the cable, ensuring you use the same T-568B wiring standard for a straight-through cable.
Part 4: The Final, Crucial Step: Testing Your Cable
Never skip testing. A visual inspection is not enough. Plug both ends of your newly made cable into your network cable tester. A good tester will have a series of lights (1 through 8) that correspond to each wire. As it tests, the lights on both the main and remote units should light up sequentially in the same order. This confirms there are no open circuits (broken wires), shorts (wires touching), or crossed pairs. If it passes, your cable is ready for deployment!
Part 5: Pro Tips for Perfect Terminations
- Practice Makes Perfect: If this is your first time, sacrifice a small piece of cable to practice on.
- Keep Wires Untwisted for the Shortest Possible Length: To maintain signal integrity and meet Cat5e standards, the length of untwisted wire should be no more than 1/2 inch.
- Verify Before You Crimp: It takes two seconds to double-check the wire order but several minutes to cut off a connector and start over. Always verify.
- Invest in a Good Crimper: A cheap, low-quality crimper can result in incomplete connections that are difficult to troubleshoot. A reliable tool is a long-term investment.
Part 6: Your Project, Our High-Quality Supplies
Congratulations! You now have the knowledge to create custom-length, reliable Cat5e Ethernet cables like a professional. This skill puts you in complete control of your network infrastructure, ensuring quality and performance from end to end.
To get started on your project, you need materials you can trust. At Dlay Cable, we provide professional-grade, high-performance cabling and connectivity solutions. From our bulk pure copper Cat5e cable to our precision-engineered RJ45 connectors and durable crimping tools, we have everything you need to build a network that lasts. Trust the experts at Dlay Cable for your next project.