

Creating your own Ethernet cables offers two significant advantages: custom lengths for a cleaner, more organized setup and a lower cost compared to buying pre-made patch cords. Whether you’re a network professional wiring an office or a DIY enthusiast setting up a home network, mastering this skill is invaluable. At DLAYCABLE, we not only provide the highest quality components but also the expertise to help you succeed.
This comprehensive guide will walk you through every step of creating a standard T568B straight-through Cat5e Ethernet cable, the most common type used for connecting computers, routers, and switches.
What You’ll Need: Tools & Materials
Using high-quality materials and the right tools is the first step to creating a reliable, high-performance cable. A weak link in your components can compromise your entire network’s speed and stability. You can find all the professional-grade supplies you need right here at DLAYCABLE.
- Bulk Cat5e Cable: Choose from our UL-Listed Riser (CMR) or Plenum (CMP) rated cables for guaranteed performance and safety compliance.
- RJ45 Connectors (8P8C): Select high-quality Cat5e connectors. Using connectors designed for the cable type (solid or stranded) is crucial for a secure connection.
- RJ45 Crimping Tool: This is the most important tool. A good crimper will strip the outer jacket, crimp the connector, and trim the wires in one go.
- Wire Stripper/Cutter: While many crimpers have a built-in stripper, a dedicated tool can offer more precision without nicking the inner wires.
- Ethernet Cable Tester: This device is essential for verifying that your cable is wired correctly and functioning without shorts or open circuits.
- Optional: RJ45 Strain Relief Boots: These boots slide over the cable before you crimp the connector, providing a more professional finish and preventing the locking tab from snagging or breaking.
Understanding Wiring Standards: T568A vs. T568B
Inside an Ethernet cable are eight wires organized into four twisted pairs. To make a functional cable, these wires must be inserted into the RJ45 connector in a specific order. There are two industry-standard wiring schemes recognized by the TIA/EIA: T568A and T568B.
- Straight-Through Cable: Both ends of the cable use the same wiring standard (e.g., T568B on both ends). This is the most common cable type, used to connect a computer to a switch, hub, or router.
- Crossover Cable: One end uses T568A and the other uses T568B. This was historically used to connect two similar devices directly, like two computers, but is now largely obsolete as most modern devices have auto-MDI/MDIX technology that automatically detects the cable type.
For this guide, we will use the T568B standard, as it is the more prevalent choice in the United States and for new networks.
The T568B Color Code
When looking at the RJ45 connector with the tab facing down and the copper pins facing up, the wire order from left to right (Pin 1 to Pin 8) is:
- Orange/White Stripe
- Orange (Solid)
- Green/White Stripe
- Blue (Solid)
- Blue/White Stripe
- Green (Solid)
- Brown/White Stripe
- Brown (Solid)
Pro Tip: A helpful mnemonic is “Orange, Green, Blue, Brown” for the solid colors on pins 2, 4, 6, and 8, with their striped pairs preceding them (except for Blue, which is swapped with Green).
Step-by-Step Guide to Making Your Cable
With your tools and materials ready, it’s time to build your cable. Work on a clean, well-lit surface and take your time to ensure precision.
Step 1: Strip the Cable Jacket
Using your crimping tool’s stripper or a dedicated wire stripper, carefully cut and remove about 1 inch (2.5 cm) of the outer jacket from the end of the cable. Be careful not to cut or nick the twisted pairs inside. Inspect the wires for any damage; if you see any, cut off the end and start again.
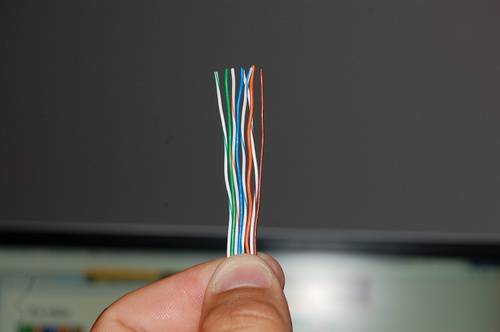
Step 2: Untwist and Arrange the Wires
Gently separate the four twisted pairs. Untwist each pair completely so you have eight individual wires. Flatten them out and carefully arrange them side-by-side in the T568B color order listed above. This is the most critical step. Double-check the order before proceeding.
Step 3: Flatten and Trim the Wires
Pinch the aligned wires tightly together to keep them in a flat, neat ribbon. The outer jacket should be as close to the aligned wires as possible. Insert the aligned wires into the trimmer slot on your crimping tool and cut them, leaving about 1/2 inch (1.25 cm) of exposed wire. A clean, straight cut is essential for all wires to make contact with the pins inside the connector.
Step 4: Insert Wires into the RJ45 Connector
Hold the RJ45 connector with the tab facing down. Carefully and slowly slide the ribbon of wires into the connector, ensuring they stay in the correct order. Push them in until all wires have fully reached the end of the connector. You should be able to see the copper ends of the wires through the transparent nose of the connector. The cable’s outer jacket should be pushed inside the connector by about 1/4 inch to be secured by the crimp.
Step 5: Crimp the Connector
Once you’ve verified the wires are fully inserted and in the correct order, place the connector into the appropriate RJ45 slot on your crimping tool. Squeeze the handles of the tool firmly and completely. You should hear a click. This action does two things: it pushes the copper pins (contacts) down to pierce the wire insulation and make a connection, and it secures the cable jacket to the connector to provide strain relief.
Step 6: Repeat for the Other End
Now, repeat steps 1-5 on the other end of the cable. Remember to use the same T568B wiring standard to create a straight-through cable.
The Final Check: Testing Your New Cable
Never assume a new cable works perfectly. A simple cable tester is a small investment that saves immense troubleshooting headaches later. Plug each end of your newly made cable into the corresponding ports on the tester. Turn it on. A good tester will light up a sequence of LEDs from 1 to 8 on both the main and remote units, indicating that all connections are correct and there are no shorts.
Common Mistakes & Troubleshooting
- Failed Test (No Lights or Mismatched Lights): The most common issue is an incorrect wire order. The second most common is that one or more wires did not fully reach the end of the connector before crimping. Cut off the end and try again, paying close attention to the T568B order.
- Intermittent Connection: This can be caused by a poor crimp or nicked wires. Ensure you are using a quality crimping tool and are careful when stripping the jacket.
- Cable Doesn’t “Click” into Port: The locking tab on the RJ45 connector may be broken or improperly crimped. Using strain relief boots can help protect these tabs.
Your Partner in Networking
Congratulations! You have successfully created a custom, high-performance Cat5e Ethernet cable. By choosing quality components from DLAYCABLE, you’ve built a foundation for a fast and stable network. Whether you need bulk cable for a large installation or just a few connectors for a home project, we are committed to providing the professional-grade products and knowledge you need to get the job done right.