

In a perfect world, your network connections would always be seamless, running on perfectly measured, single-run cables. But in reality, accidents happen. A cable gets cut during a renovation, a rodent chews through a line, or you simply need to extend a run by a few more feet. This is where knowing how to properly splice an Ethernet cable becomes an invaluable skill.
As a leading manufacturer of high-performance network cabling for over 15 years, we at DlayCable understand the critical importance of a stable connection. While we always advocate for a fresh, certified cable run for optimal performance, we also believe in empowering our clients with the practical knowledge to handle emergency repairs. dlaycable will walk you through the professional way to splice a Cat5e cable to ensure the most reliable connection possible in a pinch.
Before You Begin: Is Splicing Your Best Option?
Splicing is a method of joining two separate cables together to form a single, longer line. It’s an effective field repair, but it’s important to understand its limitations. Every splice introduces a potential point of failure and can slightly degrade signal quality (known as insertion loss and crosstalk).
- When to Splice: Splicing is ideal for repairing a small, damaged section of an in-wall or hard-to-access cable where running a completely new line is impractical or cost-prohibitive.
- Alternatives to Consider:
- RJ45 Coupler: If your cable ends are already terminated with RJ45 plugs, an inline coupler is the easiest way to connect them.
- Junction Box: For a more permanent and robust connection, a punch-down junction box provides a secure housing and reliable connections, which we recommend over a manual splice for long-term installations.
- Full Cable Replacement: For mission-critical connections or new installations, nothing beats the performance and reliability of a single, solid-core copper cable, like our Fluke-tested Cat5e bulk cables.
Essential Tools and Materials for the Job
Having the right tools is the first step toward a successful splice. At DlayCable, we know that quality tools lead to quality results. Here’s what you’ll need:
- Cable Stripper/Cutter: Designed to remove the outer PVC jacket without damaging the inner twisted pairs.
- Wire Snips or Scissors: For a clean, flush cut of the internal wires.
- B-Connectors (e.g., Scotchlok UY/UR): These are small, gel-filled connectors that create a secure, moisture-resistant connection between two individual wires without stripping them. You will need at least 8.
- Crimping Tool or Pliers: To press down the buttons on the B-connectors, engaging the connection.
- Electrical Tape or Heat Shrink Tubing: To bundle, protect, and insulate the finished splice.
- Network Cable Tester: (Highly Recommended) This is the only way to be 100% certain that your splice is correct and the connection is active.
The Step-by-Step Guide to Splicing a Cat5e Cable
Follow these steps carefully to ensure a clean and functional splice. We will use the T568B wiring standard, which is the most common in the United States.
Step 1: Prepare the Cable Ends
First, use your cable cutters to create a clean, straight cut on both ends of the cable you intend to join. Using your cable stripper, carefully score and remove about 2 inches (5 cm) of the outer jacket from each cable end. Be gentle to avoid nicking the insulation of the twisted pairs inside.
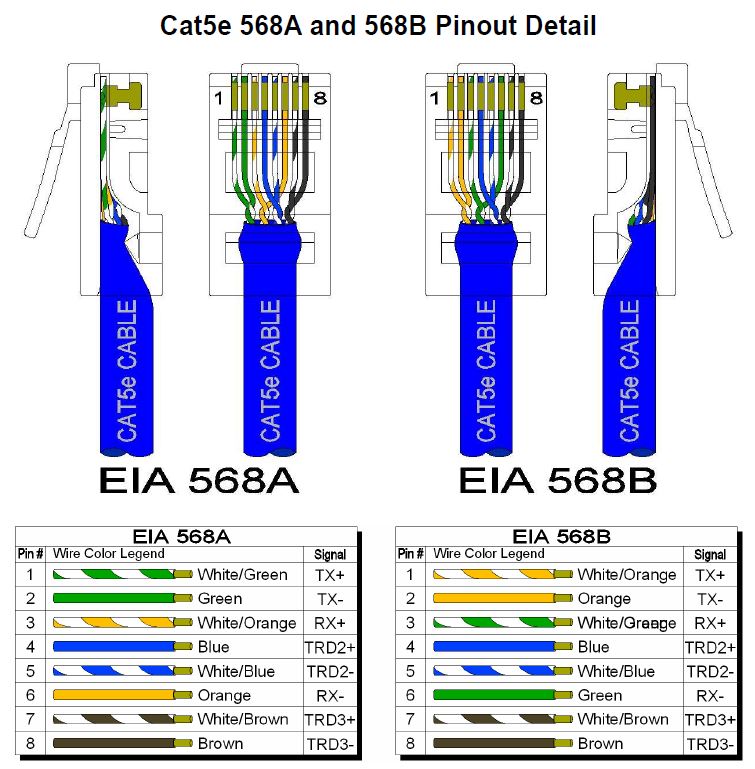
Step 2: Align Wires by Color Code (T568B Standard)
Gently untwist the four pairs of wires from both cables. You will have eight individual wires from each side. Straighten them out and arrange them side-by-side in the T568B color order. Consistency is key. The wire from one cable must connect to the same-colored wire from the other cable.
The T568B order is:
- Orange/White
- Orange
- Green/White
- Blue
- Blue/White
- Green
- Brown/White
- Brown
Step 3: Connect Wires Using B-Connectors
This is the most critical step. Work with one color-matched pair at a time to avoid confusion.
- Take the Orange/White wire from the first cable and the Orange/White wire from the second cable.
- Insert both wires fully into a single B-connector until they hit the end. The gel inside will protect the connection.
- Using your crimping tool or pliers, firmly press down on the colored button on the connector. You will feel a click as the internal contacts pierce the wire insulation and create a solid connection.
- Repeat this process for all eight wires, ensuring each wire is connected to its identical partner (Orange to Orange, Green/White to Green/White, etc.).
Step 4: Insulate and Protect the Splice
Once all eight connections are made, neatly bundle the B-connectors together. For a professional finish and maximum durability, use heat shrink tubing to cover the entire spliced area. If you don’t have heat shrink, wrap the bundle tightly and thoroughly with high-quality electrical tape, extending the wrap onto the cable jackets on both sides to provide strain relief.
Step 5: Test for a Successful Connection
Do not skip this step. Plug both ends of your newly spliced cable into a network cable tester. A good tester will confirm that all 8 pins are correctly wired and that there are no shorts. A simple pass/fail light will confirm continuity, telling you the splice was a success.
Common Pitfalls and How to Avoid Them
- The “Twist and Tape” Method: Never simply twist the copper wires together and wrap them in tape. This creates an unreliable connection prone to signal loss, interference (crosstalk), and complete failure. It does not meet any performance standards.
- Mismatching Wires: Double-check your color order before crimping. A single misplaced wire will cause the connection to fail.
- Untwisting Too Much: The twists in the pairs are essential for preventing interference. Only untwist as much as you need to make the connection (an inch or so).
- Not Testing: Assuming the splice works without testing can lead to hours of frustrating troubleshooting later. Test your work immediately.
The DlayCable Advantage: Beyond a Simple Splice
A well-executed splice can save the day, but for networking that you can count on, the quality of the cable itself is paramount. At DlayCable, we build our reputation on unmatched quality and reliability.
Our competitive advantages are your project’s advantages:
- Superior Materials: We use 100% pure bare copper conductors in our cables, which offer significantly better performance and conductivity than cheaper Copper Clad Aluminum (CCA) alternatives.
- Rigorous Testing: Every bulk cable we sell is Fluke tested to ensure it meets or exceeds TIA standards for performance, guaranteeing you get the bandwidth and stability you pay for.
- Certified Quality: With UL, ETL, CE, and RoHS certifications, our products are proven to be safe, reliable, and compliant with the highest industry standards.
- Manufacturing Expertise: With over 15 years of OEM/ODM experience, we are not just distributors; we are the factory. This gives us end-to-end control over quality and allows us to provide custom solutions for our clients worldwide.
So, while we’re happy to show you how to perform a field repair, we encourage you to build your network’s foundation on the guaranteed performance of DlayCable products. For your next project, avoid the need to splice by choosing the right length and quality from the start.
Trust your connection to the experts. Explore our range of high-performance Cat5e, Cat6, and fiber optic solutions or contact our team for a custom quote today.