

At D-Lay Cable, we are more than just a manufacturer; we are your partner in connectivity. With a deep commitment to quality, evidenced by our UL, ETL, CE, and RoHS certifications and rigorous Fluke testing, we provide end-to-end networking solutions. From high-performance bulk cables to precision-engineered connectors and tools, our factory-direct model ensures you get professional-grade products with speed and reliability. dlaycable leverages our expertise to empower you to create custom, high-performance Ethernet cables tailored to your exact needs.
Why Wire Your Own Ethernet Cable?
While pre-made patch cords are convenient, creating your own cables offers significant advantages, especially for professionals and enthusiasts. It’s a skill that puts you in complete control of your network’s physical layer.
- Perfect Custom Lengths: Eliminate messy cable slack or cables that are just too short. Create connections of the exact length required for a clean, professional installation in server racks, offices, or home networks.
- Cost-Effective for Large Projects: For installations requiring numerous connections, purchasing bulk cable and terminating it yourself is significantly more economical than buying individual patch cords.
- On-the-Spot Repairs: A damaged RJ45 connector doesn’t have to mean a dead cable. Quickly snip off the old connector and terminate a new one to get your connection back online in minutes.
- Bulk Installation: Easily pull cable through walls, conduits, and ceilings without the snag-prone connector, and terminate the ends once the cable is in place.
Essential Tools and Materials You’ll Need
Having the right tools is non-negotiable for a reliable connection. At D-Lay Cable, we supply everything you need, ensuring each component meets our high standards for performance and durability.
- Bulk Cat5e Cable: The foundation of your network. We recommend our high-quality, D-Lay Cable UTP (Unshielded Twisted Pair) Cat5e Bulk Cable, available in various jacket ratings like CM, CMR (Riser), and CMP (Plenum).
- RJ45 Connectors: These are the plastic plugs at the end of the cable. Ensure you have Cat5e-rated RJ45 connectors. Pass-through connectors are a great option for beginners as they simplify the wire alignment process.
- Ethernet Crimping Tool: This tool is essential for securely fastening the RJ45 connector to the cable and pushing the pins into the wires. Our professional crimping tools often include built-in wire cutters and strippers.
- Wire Stripper/Cutter: While often part of a crimper, a dedicated tool can offer more precision for stripping the outer jacket without damaging the inner twisted pairs.
- Ethernet Cable Tester: This is a crucial, non-skippable step for professionals. A tester verifies that all 8 pins are correctly wired and making a solid connection. It’s the only way to be 100% certain your cable works perfectly. Our network cable testers are a must-have.
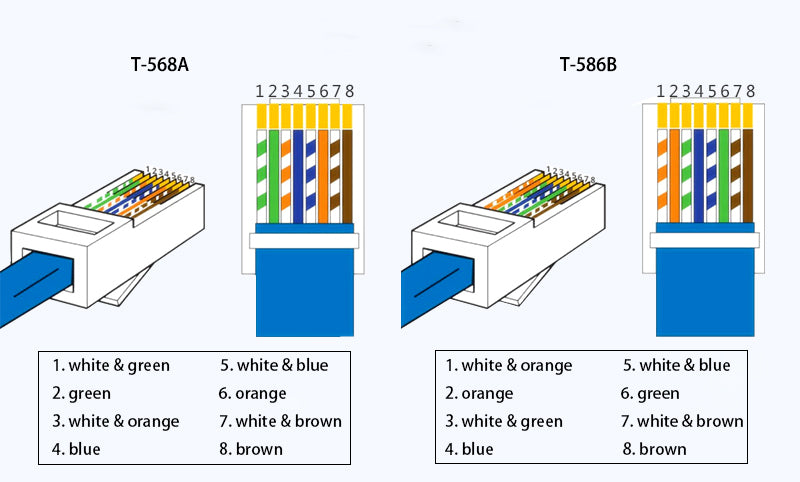
Understanding Wiring Standards: T568A vs. T568B
Inside a Cat5e cable are 8 individual wires, organized into 4 twisted pairs. To make a functional cable, these wires must be inserted into the RJ45 connector in a specific order. There are two industry-recognized standards for this: T568A and T568B.
Functionally, for most applications, there is no difference in performance between the two. However, T568B is the more common standard in the United States and for new commercial networks. The most important rule is to be consistent. For a standard “straight-through” cable (used to connect a computer to a switch, router, or wall plate), you must use the same standard on both ends.
T568B Pinout (Left to Right, with the connector tab facing down)
- Pin 1: Orange/White Stripe
- Pin 2: Orange
- Pin 3: Green/White Stripe
- Pin 4: Blue
- Pin 5: Blue/White Stripe
- Pin 6: Green
- Pin 7: Brown/White Stripe
- Pin 8: Brown
T568A Pinout (Left to Right, with the connector tab facing down)
- Pin 1: Green/White Stripe
- Pin 2: Green
- Pin 3: Orange/White Stripe
- Pin 4: Blue
- Pin 5: Blue/White Stripe
- Pin 6: Orange
- Pin 7: Brown/White Stripe
- Pin 8: Brown
Step-by-Step Guide to Wiring a Cat5e Cable (T568B)
Let’s walk through creating a standard straight-through cable using the more common T568B standard.
Step 1: Strip the Outer Jacket
Using your wire stripper, carefully score and remove about 1 inch (2.5 cm) of the outer cable jacket. Be gentle to avoid nicking or cutting the delicate inner wires. Once scored, the jacket should pull off easily.
Step 2: Untwist and Separate the Wires
You will see four twisted pairs of wires. Gently untwist each pair and separate all 8 individual wires. Try to straighten them out as much as possible to make them easier to manage.
Step 3: Align the Wires (The T568B Pattern)
This is the most critical step. Arrange the 8 wires flat and parallel to each other, in the exact T568B order from left to right:
Orange/White, Orange, Green/White, Blue, Blue/White, Green, Brown/White, Brown.
Double-check the order. Getting this wrong is the most common point of failure.
Step 4: Trim and Insert into the RJ45 Connector
Hold the aligned wires tightly together. Use the straight cutter on your crimping tool to trim the ends so they are perfectly flush and even. The final length of the exposed wires should be about 1/2 inch (1.25 cm). This ensures the cable jacket will be securely crimped inside the connector for strain relief.
With the RJ45 connector’s locking tab facing down, carefully slide the aligned wires into the connector. Each wire should slide into its own channel. Push firmly until the wires reach the very end of the connector. You should be able to see the copper ends of the wires through the clear nose of the plug.
Step 5: Crimp for a Secure Connection
Insert the RJ45 connector into the appropriate slot on your crimping tool. Squeeze the handles firmly and evenly. You should hear a ‘click’ as the tool pushes the gold-plated pins through the wire insulation, making a solid electrical connection. It will also press a strain-relief bar onto the cable jacket, securing the cable in place.
Step 6: Repeat for the Other End
Now, repeat steps 1-5 on the other end of the cable, using the exact same T568B wiring standard to create your straight-through cable.
The Final Check: Testing Your Custom Cable
Do not skip this step! Plug both ends of your newly made cable into an Ethernet cable tester. A good tester will have a series of lights (1 through 8) that light up in sequence on both the main and remote units. If they all light up green in a 1-to-1 order, congratulations! You have a perfectly wired, reliable cable.
If any lights are out of order, dim, or don’t light up, you have a fault (a short or an open circuit). The most likely cause is an incorrect wire order or a bad crimp. Snip off the connector and try again. This is why we, as a quality-focused company, emphasize testing—it’s the same principle behind our own 100% Fluke-tested finished products.
Pro-Tips from the D-Lay Cable Experts
- Mind the Twists: Keep the wires twisted as close to the connector as possible. The twists are crucial for preventing crosstalk and interference. Don’t untwist more than 1/2 inch of wire.
- Use a Strain-Relief Boot: Slide a boot onto the cable before you crimp on the RJ45 connector. After testing, slide it over the connector to provide extra strain relief and a more professional finish.
- Pass-Through Connectors for the Win: If you are new to this, consider using pass-through RJ45 connectors. They allow the wires to pass all the way through the front of the plug, letting you visually confirm the wire order is correct before you crimp. A special pass-through crimp tool will trim the excess wires automatically.
Your Partner in Professional Networking
You’ve now mastered the essential skill of wiring a Cat5e Ethernet cable. By following these steps and using high-quality materials, you can create reliable, custom network connections that meet professional standards.
At D-Lay Cable, we are dedicated to supporting your projects, big or small. Whether you need a single box of bulk cable for a home project or are looking for an OEM/ODM partner for large-scale custom solutions, our professional team is here to help. Explore our full range of cables, connectors, tools, and accessories, or contact us today to experience the D-Lay Cable advantage of quality, speed, and expertise.