

In today’s hyper-connected world, a stable, high-speed network is the backbone of any successful operation, from a home office to a corporate data center. While pre-made patch cords are convenient, the ability to create custom-length, high-performance Cat6 cables is a critical skill for any professional installer, IT technician, or serious DIY enthusiast. It ensures a perfect fit, minimizes signal loss from excess cable, and gives you complete control over the quality of your connection.
At D-Lay Cable, we don’t just supply industry-leading network cabling; we empower our partners with the knowledge to build robust and reliable network infrastructures. dlaycable will walk you through the process of terminating a Cat6 cable, focusing on the precision and quality materials that guarantee optimal performance.
In This Guide:
Essential Tools and High-Quality Materials
A flawless network connection starts with the right components. Using substandard tools or materials is the fastest way to create a cable that underperforms or fails entirely. Here’s what you’ll need for a professional-grade result:
The Tools of the Trade:
- High-Quality Bulk Cat6 Cable: The foundation of your cable. A premium Cat6 cable from a trusted supplier like D-Lay Cable features a higher gauge of copper, better shielding, and a central spline to reduce crosstalk between pairs.
- Cat6 RJ45 Connectors/Plugs: These are not the same as Cat5/5e plugs. Cat6 connectors have a staggered design to accommodate the thicker wires and maintain pair separation, which is crucial for performance.
- Crimping Tool: A quality ratcheting crimper designed for RJ45 plugs ensures a uniform and secure connection every time.
- Cable Stripper/Cutter: A dedicated cable stripper will remove the outer jacket without nicking the delicate inner wires.
- Flush Cutters or Network Scissors: For a clean, flat cut of the conductors before inserting them into the plug.
- Cable Tester: This is a non-negotiable final step. A good LAN cable tester verifies that every pin is correctly wired and that there are no shorts or open circuits.
Understanding the Wiring Standards: T568A vs. T568B
Before you cut a single wire, you need to know the “blueprint.” There are two recognized standards for wiring an Ethernet cable: T568A and T568B. While functionally identical in performance, T568B is the most widely used standard in commercial and residential networks today.
For a standard “straight-through” cable (used to connect a computer to a switch, router, or wall plate), you will use the same standard on both ends. We recommend sticking with T568B for consistency.
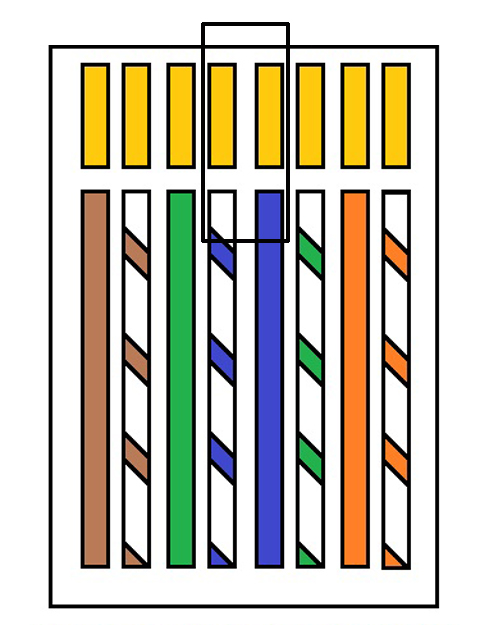
T568B Wiring Scheme (Left to Right, Pin 1 to 8):
- White/Orange
- Orange
- White/Green
- Blue
- White/Blue
- Green
- White/Brown
- Brown
Step-by-Step Guide to Making a Cat6 Cable
With your tools and standards ready, it’s time to build. Precision is key. Follow these steps carefully for each end of the cable.
Step 1: Measure and Cut the Cable
Measure the length of cable you need, adding a little extra for slack. Make a clean, straight cut using your crimper’s cutting blade.
Step 2: Strip the Outer Jacket
Using your cable stripper, carefully score and remove about 1 to 1.5 inches (2.5-4 cm) of the outer PVC jacket. Be cautious not to cut into the twisted pairs underneath. Inspect the wires for any nicks; if you see any, cut the end off and start again.
Step 3: Prepare the Wires
You will see four twisted pairs of wires and, in a quality Cat6 cable, a plastic spline (or cross-web filler) in the center. Trim the spline and any rip cord flush with the jacket. Then, begin to untwist each of the four pairs. Try to keep the untwisted portion as short as possible—no more than half an inch (1.27 cm)—to minimize crosstalk.
Step 4: Align the Wires (T568B Standard)
Flatten and straighten the eight individual wires. Carefully arrange them side-by-side in the T568B color order mentioned above. Hold them tightly between your thumb and forefinger to keep them in the correct sequence and perfectly flat.
Pro Tip: Double-check the color order. Then check it again. This is the most common point of failure.
Step 5: Trim the Wires to Length
While holding the wires firmly in order, use your flush cutters or the crimper’s blade to make a single, clean cut across the top of the wires. They should be about half an inch long from the edge of the jacket. The end must be perfectly flat to ensure all wires make contact inside the RJ45 plug.
Step 6: Insert Wires into the RJ45 Connector
Hold the RJ45 plug with the locking tab facing down and the pins facing away from you. Carefully and slowly slide the aligned set of wires into the plug. Each wire should slide into its own dedicated channel. Push firmly until the wires reach the very end of the plug. You should be able to see the shiny copper ends through the clear plastic tip of the connector. Also, ensure the cable’s outer jacket is pushed inside the plug for strain relief.
Step 7: Crimp the Connector
Insert the RJ45 plug into the appropriate slot on your crimping tool. Squeeze the handle firmly and evenly until the tool completes its ratcheting cycle. This action does two things: it pushes the gold-plated pins down to pierce the wire insulation and make contact with the copper, and it secures the cable jacket to the plug for strain relief.
Step 8: Repeat for the Other End
Go back to Step 1 and repeat the entire process for the other end of the cable, ensuring you use the same T568B wiring standard for a straight-through cable.
The Final Step: Testing for a Perfect Connection
Do not skip this step! Plug both ends of your newly created cable into your LAN tester. A good tester will check for continuity on all eight pins and alert you to any miswires, shorts, or open connections. A “Pass” means you have a perfectly functional, high-performance cable. If it fails, re-examine both ends to find the mistake and re-terminate as needed.
Common Mistakes to Avoid
- Incorrect Wire Order: The most frequent error. Always double-check the T568B sequence before crimping.
- Not Pushing Wires All the Way In: If a wire doesn’t reach the end of the plug, it won’t make contact with the pin, resulting in an open circuit.
- Untwisting Too Much Cable: The “twist” in the pairs is essential for preventing interference. Keep the untwisted portion to a minimum.
- Nicking the Inner Wires: A damaged conductor can compromise signal integrity or break entirely.
- Using the Wrong Plugs: Insisting on Cat6-rated RJ45 plugs is crucial for achieving Cat6 speeds and reliability.
Frequently Asked Questions (FAQ)
- Can I use Cat5e RJ45 plugs on a Cat6 cable?
- While it might physically fit, it’s strongly discouraged. Cat6 wires are thicker, and Cat5e plugs don’t have the staggered-pin design needed to minimize crosstalk. Using Cat5e plugs on a Cat6 cable will limit its performance to Cat5e levels.
- What is the maximum length for a Cat6 cable?
- The maximum length for a single run of Cat6 cable is 100 meters (328 feet) to guarantee performance up to 10 Gbps (for shorter distances). For reliable connections, it’s always best to use a solid-core bulk cable for infrastructure runs and stranded patch cables for connecting devices.
- When would I use the T568A standard?
- T568A is still used in some federal government contracts and as the residential standard. The only time you’d mix T568A and T568B is to create a “crossover” cable (one end A, one end B), which was once used to connect two computers directly. However, modern network devices have auto-MDI/MDI-X, making crossover cables largely obsolete.