

Creating your own custom-length network cables is a skill that empowers every DIY enthusiast and professional installer. It saves money, reduces clutter, and ensures a perfect fit for every connection. At D-Lay Cable, we’re not just suppliers of premium networking components; we’re partners in your project’s success. dlaycable provides a definitive, step-by-step process for terminating Cat6 cable, ensuring you get the gigabit speeds and reliability you expect. We’ll cover terminating with an RJ45 plug and a keystone jack, using the professional techniques and quality materials that guarantee a flawless connection.
Why Quality Cat6 and Components Matter
Before you even cut the first wire, the quality of your materials will determine the success of your network. A chain is only as strong as its weakest link, and in networking, this is especially true. Here’s why choosing premium components from a trusted supplier like D-Lay Cable is non-negotiable:
- Pure Bare Copper vs. CCA: Our Cat6 cables use 100% pure bare copper conductors. This ensures maximum signal integrity, lower resistance, and better heat dissipation compared to inferior Copper Clad Aluminum (CCA) cables. CCA is brittle, prone to failure, and not compliant with TIA/EIA standards for Cat6 performance.
- Properly Shielded and Twisted Pairs: Cat6 performance relies on the precise twisting of its internal wire pairs to cancel out electromagnetic interference (EMI), or “crosstalk.” Our cables are manufactured to exact specifications to protect your data from interference from power lines or other cables.
- High-Quality RJ45 Connectors and Keystone Jacks: The connectors are where the physical connection happens. Quality connectors, like those we offer, have sharp, durable pins that properly pierce the wire insulation and gold plating to prevent corrosion over time, ensuring a reliable connection for years.
Essential Tools and Materials for the Job
Having the right tools makes the job faster, easier, and more reliable. Gather these items before you begin. You can find all the necessary high-quality cables and components right here at D-Lay Cable.
- Bulk Cat6 Cable: Choose the right type for your project (e.g., UTP/Unshielded, Riser/CMR, or Plenum/CMP). We recommend our pure copper Cat6 for best results.
- RJ45 Cat6 Connectors: Ensure they are specifically rated for Cat6. The wire channels are often staggered or larger to accommodate the thicker 23 AWG wires of Cat6 cable.
- Crimping Tool: A quality RJ45 crimper is essential. It securely fastens the connector to the cable and presses the pins into the wires.
- Cable Stripper/Cutter: While some crimpers have a built-in stripper, a dedicated tool provides a cleaner, more precise cut without nicking the inner wires.
- Network Cable Tester: This is a must-have. A tester verifies that all eight wires are correctly connected and that there are no shorts or open circuits.
- (For Keystone Jacks) Punch-Down Tool & Keystone Jacks: If you’re wiring to a wall plate or patch panel, you’ll need these instead of RJ45 plugs for that end of the cable.
T568A vs. T568B: Understanding the Wiring Standards
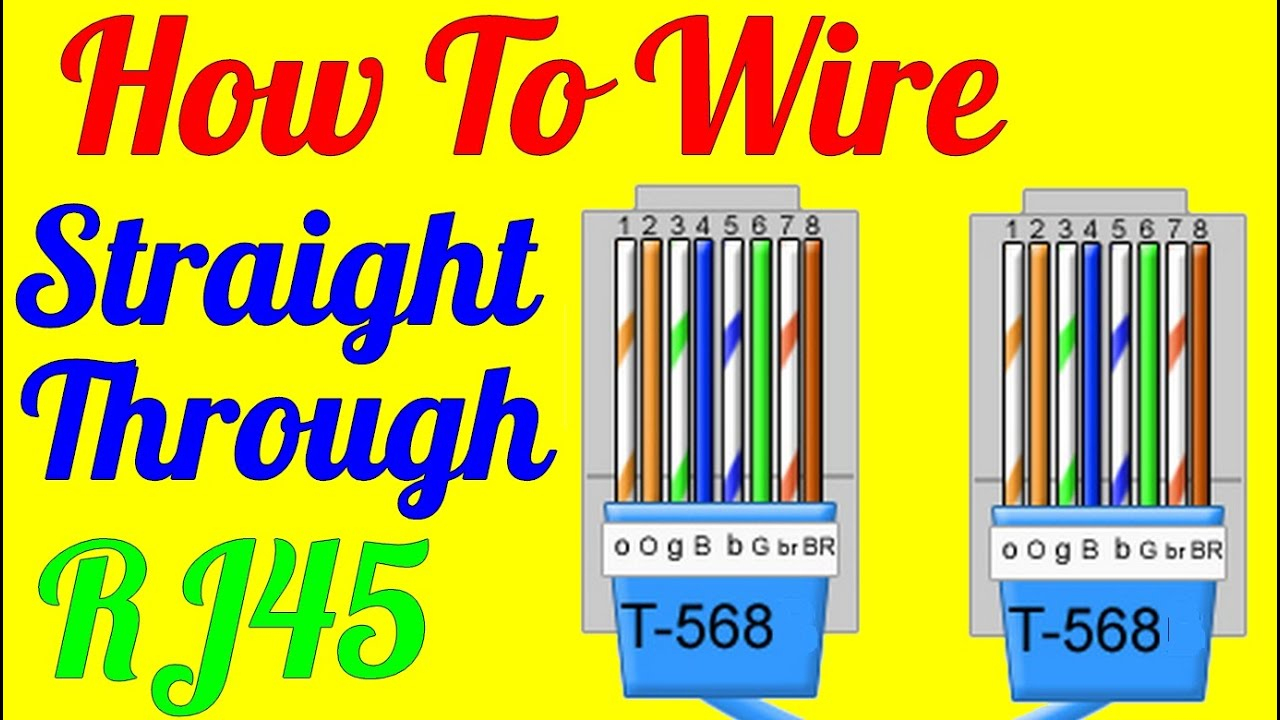
There are two recognized standards for wiring Ethernet cables: T568A and T568B. Both work equally well. The critical rule is to pick one standard and use it consistently throughout your entire project. For a standard “straight-through” patch cable, both ends must be wired identically. T568B is the more common standard in the United States.
Here is the color code from left to right, with the RJ45 connector’s tab facing down:
T568B (Most Common)
- Orange-White
- Orange
- Green-White
- Blue
- Blue-White
- Green
- Brown-White
- Brown
T568A
- Green-White
- Green
- Orange-White
- Blue
- Blue-White
- Orange
- Brown-White
- Brown
Step-by-Step: Terminating a Cat6 Cable with an RJ45 Connector
Follow these steps carefully for a perfect termination every time.
- Step 1: Strip the Outer Jacket
Using your cable stripper, carefully score and remove about 1 inch (2.5 cm) of the outer cable jacket. Be gentle to avoid cutting or nicking the twisted pairs inside. Once scored, the jacket should pull off easily. - Step 2: Prepare the Wires
You will see four twisted pairs of wires and often a plastic spline or divider. Cut and remove the spline as close to the jacket as possible. Then, gently untwist each of the four pairs and straighten them out as much as you can. The less kinking, the better. - Step 3: Arrange the Wires
Flatten the eight wires and arrange them side-by-side in the correct order for your chosen standard (we’ll use T568B for this example).Order (Left to Right): Orange-White, Orange, Green-White, Blue, Blue-White, Green, Brown-White, Brown.
Keep them flat and tightly held together.
- Step 4: Trim the Wires
While holding the wires firmly in order, use the cutting blade on your crimper or a sharp cutter to trim them to a uniform length of about 1/2 inch (1.25 cm) from the edge of the jacket. The cut must be clean and perfectly straight. - Step 5: Insert Wires into the RJ45 Connector
Hold the RJ45 connector with the tab facing down and the openings facing you. Carefully and slowly slide the aligned wires into the connector, ensuring they stay in the correct order. Each wire should slide into its own internal channel. Push until the wires reach the very end of the connector. You should be able to see the shiny copper tips at the end. The cable jacket should also be pushed inside the connector base for strain relief. - Step 6: Crimp the Connector
Insert the connector into the appropriate slot on your crimping tool. Squeeze the handles of the crimper firmly and completely. You should hear a click. This action does two things: it pushes the gold pins down to pierce the insulation and make contact with the copper wire, and it secures the cable jacket at the base of the connector.
Repeat this process on the other end of the cable using the same wiring standard.
Bonus: Terminating a Cat6 Cable into a Keystone Jack
For a clean installation into a wall plate or patch panel, you’ll use a keystone jack.
- Step 1: Prepare the Cable
Strip about 1-2 inches of the outer jacket from the end of the cable. You do not need to untwist the pairs as much for a keystone. - Step 2: Align Wires with the Color Code
Keystone jacks have a color-coded diagram printed on the side for both T568A and T568B. Choose your standard and lay the wires into their corresponding color-coded slots. Do not remove the insulation. - Step 3: Punch Down the Wires
Using a punch-down tool, press each wire firmly into its slot. The tool will cut the excess wire and simultaneously seat the wire into the metal contacts inside the jack. - Step 4: Tidy Up
Place the plastic cap on the jack (if included) and snap the finished keystone jack into your wall plate or patch panel.
The Final, Crucial Step: Testing Your Cable
Never skip this step. A cable tester will save you from future headaches. Plug one end of your newly made cable into the main tester unit and the other end into the remote unit. Turn it on. A good tester will light up in sequence from 1 to 8 on both units, indicating that all connections are correct and in the right order. If any lights are out of order, dim, or don’t light up at all, you have a fault (see below).
Common Mistakes and How to Avoid Them
- Crossed Pairs: The most common error. The tester will show lights out of sequence. Solution: Cut off the connector and re-terminate, paying close attention to the color code.
- Not Fully Seated Wires: A wire didn’t reach the end of the RJ45 plug. The tester will show an unlit number. Solution: Re-terminate, making sure to push the wires all the way in.
- Jacket Not Secured: The cable jacket isn’t inside the connector for crimping. This leads to strain on the thin wires and early failure. Solution: Ensure the jacket is stripped to the proper length (about 1 inch) and pushed firmly into the connector base before crimping.
Your Project, Our Commitment
Congratulations! You now have the knowledge to create professional-grade Cat6 network cables. By following these steps and, most importantly, starting with high-quality materials, you ensure your network will be fast, stable, and reliable. At D-Lay Cable, we are committed to providing the best pure copper cables, tools, and components to make your project a success. Browse our full selection of networking products and build your next project with confidence.