

Welcome! At D-Lay Cable, we don’t just manufacture high-performance networking components; we empower our partners and customers with the knowledge to build fast, stable, and future-proof networks. A robust network foundation starts with properly terminated cables. While it may seem daunting, wiring your own Cat6 Ethernet cable is a skill that gives you complete control over your network’s quality and length.
This comprehensive guide will walk you through every step of terminating a Cat6 cable with an RJ45 connector. Follow along, and you’ll be creating professional-grade patch cables in no time.
Before You Begin: Tools and Materials You’ll Need
Having the right tools and materials is non-negotiable for a clean, reliable connection. Investing in quality components from the start prevents frustrating troubleshooting later.
Essential Tools:
- Crimping Tool (RJ45): This tool securely fastens the RJ45 connector to the cable. A good crimper will provide even pressure for a solid connection.
- Cable Stripper/Cutter: Designed to score and remove the outer jacket of the Ethernet cable without damaging the internal twisted pairs.
- Network Cable Tester: This is your quality control. A tester verifies that all eight wires are correctly connected and that there are no shorts. Do not skip this!
Essential Materials:
- Bulk Cat6 Cable: For best performance, always choose a cable with solid pure copper conductors. D-Lay Cable’s range of Cat6 cables ensures you meet and exceed industry standards for speed and low signal loss.
- Cat6 RJ45 Connectors: It’s crucial to use connectors specifically designed for Cat6. They have staggered internal channels to accommodate the thicker wires and reduce crosstalk. Using Cat5e plugs on Cat6 cable is a common point of failure.
Understanding the Wiring Standards: T568A vs. T568B
Inside a Cat6 cable are eight wires, grouped into four twisted pairs. To make them work, they must be arranged in a specific order. There are two industry-accepted standards: T568A and T568B.
The golden rule is consistency. For a standard “straight-through” patch cable (used for connecting a computer to a switch, router, or wall plate), you must use the same standard on both ends.
- T568B: This is the most common standard used in the United States and for new commercial networks. We recommend using T568B unless you need to match an existing installation using T568A.
- T568A: This standard is often required for U.S. government residential projects and is functionally identical to T568B.
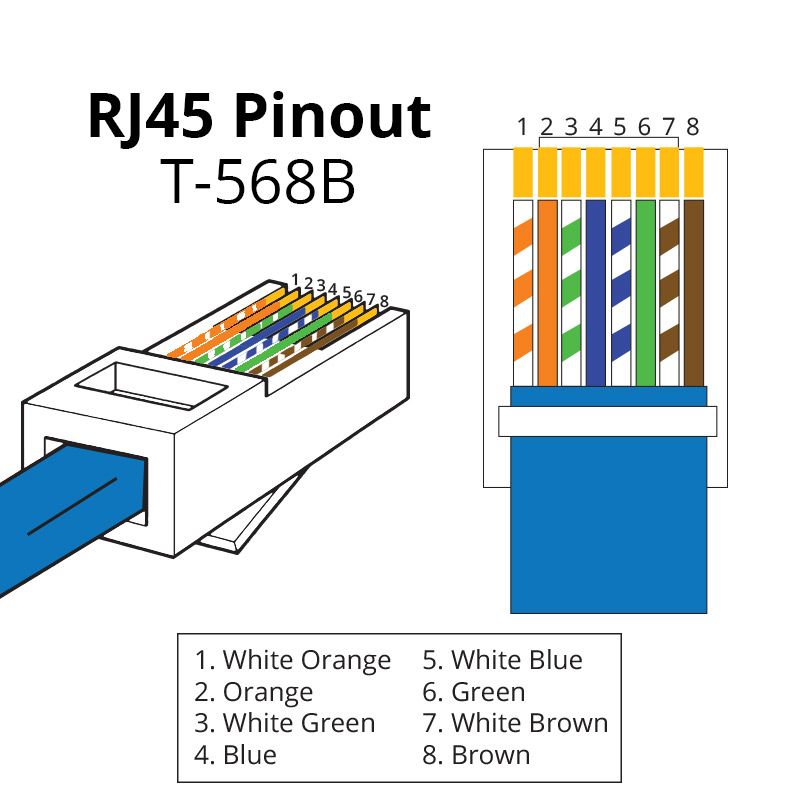
Here are the color codes, viewed from left to right with the RJ45 connector’s tab facing down:
T568B Color Code:
- Orange/White
- Orange
- Green/White
- Blue
- Blue/White
- Green
- Brown/White
- Brown
T568A Color Code:
- Green/White
- Green
- Orange/White
- Blue
- Blue/White
- Orange
- Brown/White
- Brown
For the rest of this guide, we will proceed using the T568B standard.
Step-by-Step Guide: Terminating a Cat6 Cable with an RJ45 Connector
With your tools, materials, and chosen standard, you’re ready to begin. Work on a clean, well-lit surface.
Step 1: Strip the Cable Jacket
Using your cable stripper, carefully cut and remove about 1 inch (2.5 cm) of the outer jacket from the end of the cable. The goal is to only score the jacket, not the wires inside. Once scored, you can bend the cable to break the jacket and pull it off.
Step 2: Prepare the Wires
Inside, you will see the four twisted pairs and a plastic spline (cross-web filler). This spline is unique to Cat6 and helps separate the pairs to reduce signal interference (crosstalk).
- Cut the spline and the thin rip cord flush with the cable jacket.
- Carefully untwist each of the four pairs. Only untwist them as much as necessary to get them straight—about half an inch (1.25 cm). Keeping the twists as close to the connector as possible is key for Cat6 performance.
Step 3: Arrange the Wires (T568B)
Now, meticulously arrange the eight straightened wires into the T568B color-coded sequence. Flatten them out and hold them tightly between your thumb and forefinger.
(Left to Right): Orange/White, Orange, Green/White, Blue, Blue/White, Green, Brown/White, Brown.
Once they are in the correct order, use your cutter to trim the ends perfectly straight, leaving about 1/2 inch of wire exposed from the jacket. A clean, straight cut is essential for all wires to make contact inside the plug.
Step 4: Insert Wires into the RJ45 Plug
Hold the RJ45 connector with the tab facing down. Carefully and slowly slide the aligned group of wires into the connector. Ensure each wire slides into its own internal channel. Push firmly until all wires reach the very end of the connector. You should be able to see the shiny copper ends through the transparent nose of the plug.
Crucial Check: The cable’s outer jacket should be pushed inside the plug, past the strain relief latch, to ensure the connector is securely clamped onto the jacket, not the fragile wires.
Step 5: Crimp the Connector
Insert the RJ45 connector into the appropriate slot on your crimping tool. Squeeze the handle firmly and evenly. You should hear a ‘click’. This action does two things: it pushes the gold-plated pins down to pierce the wire insulation and make contact with the copper, and it secures the strain relief latch onto the cable jacket.
Step 6: Repeat for the Other End
Now, simply repeat steps 1-5 on the other end of the cable, ensuring you use the exact same T568B wiring standard.
The Final, Crucial Step: Testing Your Cable
Never assume a cable works. Plug both ends of your newly created cable into your network cable tester. A good tester will have a main unit and a remote unit. It will check each of the 8 pins for continuity.
Turn it on and watch the lights. A successful “pass” will show a one-to-one correspondence (1-1, 2-2, 3-3, etc.). If you get a “fail,” “cross,” or “short” error, it means you have a bad connection. The most common cause is wires being out of order. Cut the connector off and try again.
Pro Tips for a Flawless Installation
- Don’t Untwist Too Much: The twists are your primary defense against crosstalk. Preserve them as much as possible right up to the connector.
- Mind the Bend Radius: Don’t create sharp kinks or bends in the cable. The rule of thumb is a bend radius no tighter than four times the cable’s diameter.
- Use Quality Components: The performance of your network is only as strong as its weakest link. Using high-grade, pure copper Cat6 cable from a trusted supplier like D-Lay Cable and proper Cat6-rated connectors makes a measurable difference.
Frequently Asked Questions (FAQ)
- Can I use Cat5e connectors on Cat6 cable?
- It is strongly discouraged. Cat6 wires are thicker, and Cat6-specific connectors are designed to accommodate them and maintain proper separation to meet performance standards. Using Cat5e plugs can lead to connection failures and will not deliver true Cat6 speeds.
- What is the maximum length for a Cat6 cable run?
- The maximum length for a single Cat6 cable run is 100 meters (328 feet). For runs longer than this, you should use a network switch or install a fiber optic backbone.
- Solid vs. Stranded Cat6: What’s the difference?
- Solid Cat6 cable, which has a single solid copper conductor per wire, is best for long, permanent runs in walls and ceilings (e.g., connecting a wall jack to a patch panel). Stranded cable is more flexible and is best for shorter patch cords that are moved around frequently. dlaycable is primarily for terminating solid cable.
Your Foundation for a High-Performance Network
Congratulations! You now have the knowledge to create custom-length, high-performance Cat6 Ethernet cables. This skill not only saves money but ensures every connection in your network is built for maximum speed and reliability.
At D-Lay Cable, we’re committed to providing the professional-grade products that form the backbone of these powerful networks. From our UL-listed pure copper Cat6 cable to our precision tools and connectors, we provide the reliable components you need to get the job done right the first time. Build with confidence, build with D-Lay Cable.